Connect
ControliQ Connect, or simply Connect, is a highly flexible method of uploading operational data to ControliQ. Often data is already available in existing systems which can be used to support the ActiveOps Method. ControliQ Connect consolidates this data into the Core Tasks, Diverted Tasks, Downtime, and Resource categories of ControliQ, minimizing the need for data to be entered manually.
Users can securely upload data from any application (referred to here as a Source System), to ControliQ, either automatically or manually through Connect (as shown below) or through Transactional APIs.
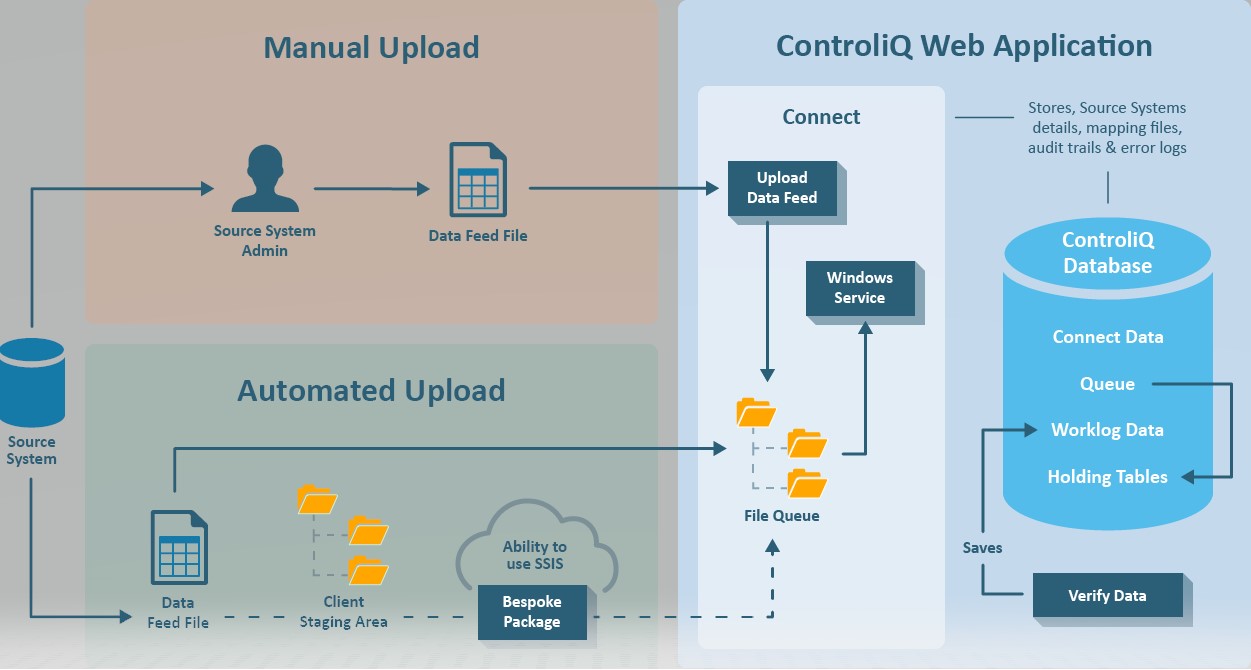
Access to different Connect functionalities is permission-controlled, which is configurable in the System Settings > Permissions to Role screen and is driven by the Workgroup level assigned to the source system at any given time. Therefore, users may find that some of the screens explained in this document are not visible to them, or that they are unable to perform their assigned role for a particular source system. Request access through your ControliQ admins or Centre of Excellence.
The data required by ControliQ is relatively simple in nature and can be expressed as Core Task Volumes and Staff Member Time data.
Core task volumes are subdivided into Work Out, Work In and Work in Progress:
-
Work Out = Volumes of Core Task items completed by each staff member per day
-
Work In* = Volume of new Core Task items received per day for the team or department
-
Work In Progress* = Volume of outstanding Core Tasks per day for the team or department
| Note: -ControliQ accepts either Work In or Work In Progress data, but not both. If Work In data is provided, ControliQ will calculate Work In Progress and vice versa. |
Staff Member Time is subdivided into the following categories:
-
Diverted Activities: Time spent by each staff member each day in core activities such as meetings, training etc
-
Down Time: Time spent by each staff member away from work such as Sickness or Annual Leave / other time off etc
-
Resource data: Time spent by each staff member on over time, Flexitime, total working time (Staff Complement), or time lent to other teams.
A Source System is the originating application from which data will be uploaded to ControliQ such as completed work (Work Out), Work-In Progress or Work In, Diverted activities, Downtime and Resource data. When setting up a Source System, you can create and define the unique characteristics of the incoming data, as well as determining how data should be handled once in Connect.
Connect offers a simple and easily managed way to both execute and automate the data transfer process into ControliQ. Connect works using easily generated comma-separated value (.csv) files, XML or Microsoft Excel (.xlsx) files with simple structures, referred to here as the Feed Files.
Feed files are files uploaded to Connect to provide details of work completed and time spent on activities. Connect uses the Feed File in combination with a Source System set up and Mapping File, to translate data into information that can be recorded against the tasks and categories defined in ControliQ.
Multiple source systems can be used for uploading data. Source Systems may have data for work queues (Work-In-Progress or Work In), work completed (WorkOut), time spent in diverted or downtime activities, resources, or planned future activities. Examples of source systems that could provide data include:
-
Workflow tools
-
Transaction processing applications
-
HR systems
In ControliQ, all latest versions of Excel from 2008 are accepted. The maximum file size allowed for any manual data uploads is 20 megabytes (MB).
| Benefit | Feature | |
|---|---|---|
| Enhanced data Quality & automation | Allows data from client source systems to be quickly uploaded into ControliQ | Improves data accuracy by using data from existing sources including Workflow and Transactional Processing Systems. |
| Automatic uploads | Automatic data transfer is available using SFTP. Where this is not possible, you can upload feed files manually via the ControliQ user interface | |
| Accepts differing formats from multiple sources | Multiple Source Systems | Allows data from multiple sources to be consolidated and translated into a common language that is clear for your Operations teams. |
| Flexible format of data uploads | Data can be loaded as CSV, XML or Excel Format. Several date formats are available, minimizing the need to customize data extracts from existing systems. | |
| You can also specify which row of your feed file you want to be the 'header' row. This is useful if your feed files have additional header sections. | ||
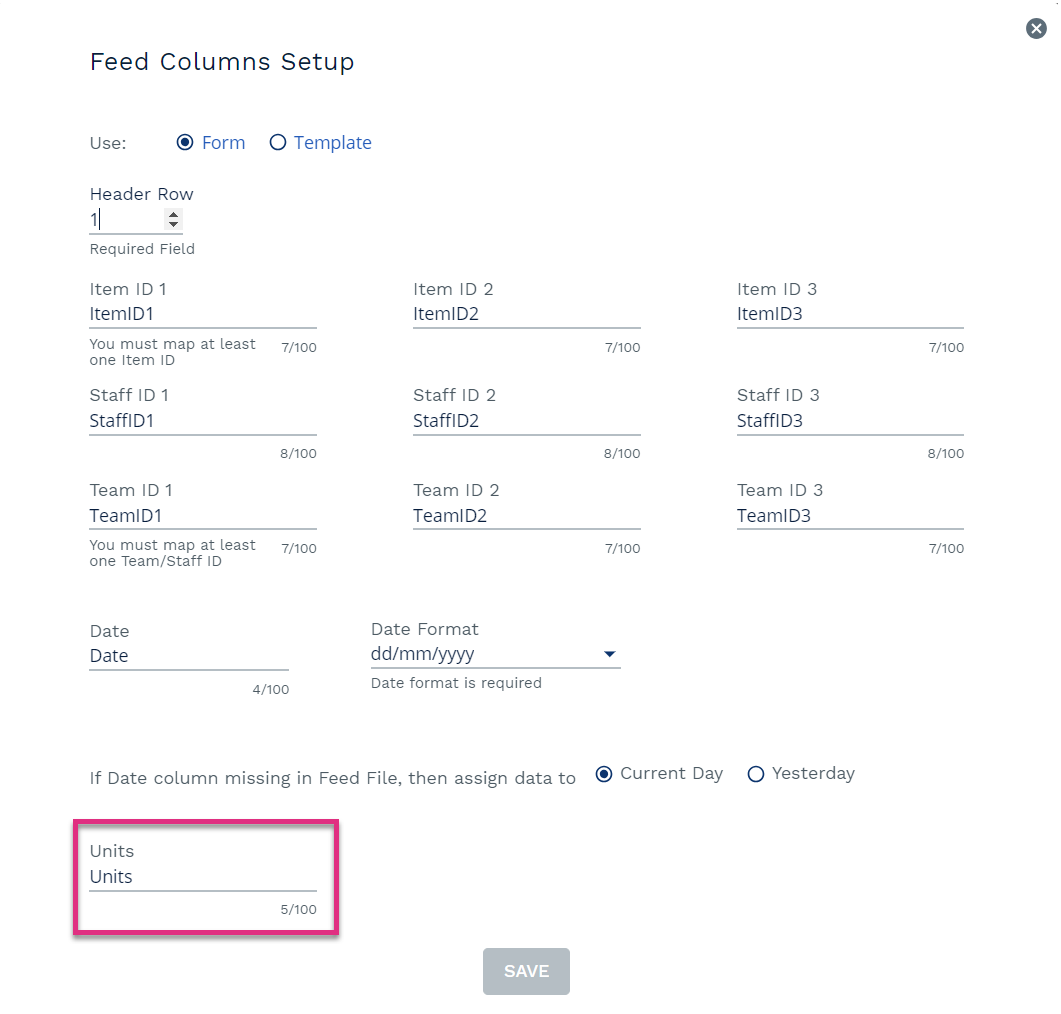
| Applied logic where data is not available | It is preferable to provide a data column with the volume or “Units” of work, however not all data sources have this ability to provide this information. In these cases, Connect counts each row without a “Units” entry as having a unit value of '1'. | |
| If your data source does not have a date column you can either choose for the data to be assigned to the “current day” or “yesterday”. | ||
| If Work Out is provided for a staff member but no Team is specified, Connect will check to see whether the Task is associated to the home team of the staff member, and if so, attribute the Work Out to the staff members home team. | ||
| You also have the option to specify a “default” Team to count Work Out against, which is useful when staff members from other Departments are loaned to cope with peak volumes, but tasks are shared across Teams. | ||
| For some workflow systems it is only possible to provide a count of Work-In-Progress where there is on hand work. To manage Work-In-Progress effectively we need to know the current Work-In-Progress for all items, including when the Work-In-Progress is 0 items. Connect allows you to set Work-In-Progress to 0 if no data is provided in the WIP feed for a task. | ||
| Flexible Data Mapping | Many-to-one mappings | Many-to-one mappings allow you consolidate and simplify data for reporting, forecasting, and planning. |
| Wildcard mapping | Reduces the number of mappings that are required as ControliQ can map multiple items using a single column of data where this is appropriate, whilst also allowing you to only consider specific values from a second [or third] column only when this is relevant. See section on Wildcard mapping for more details. | |
| Ability to ignore data | Allows you to create mappings ahead of time for new staff members, source system items, or ignore redundant or duplicate processes. | |
| Upload bulk mappings | Allows you to quickly update mappings. | |
| ‘On screen’ mapping | Enables you to make minor changes to mapped items in ControliQ quickly and accurately. | |
| Control | Decide when to Publish data | You can control whether a data feed is automatically published or not. This is useful when you are first setting up your data feeds and checking mappings etc. |
| Data roll-back | Allows quick and easy removal of data that has been published. | |
| Exception reporting | Assists in identifying issues with feed files, mapping errors or new items that appear in feed files that need to be added to mapping tables. | |
| Permission controls linked to hierarchy | Allows the right people to manage source systems, mappings, and data upload, preserving the integrity of data in ControliQ. | |
To map the source system’s feed column names using an existing feed file as a template, select Template in the Feed Columns Setup pop up. You can then browse to the location of the feed file in your own system and click Define.
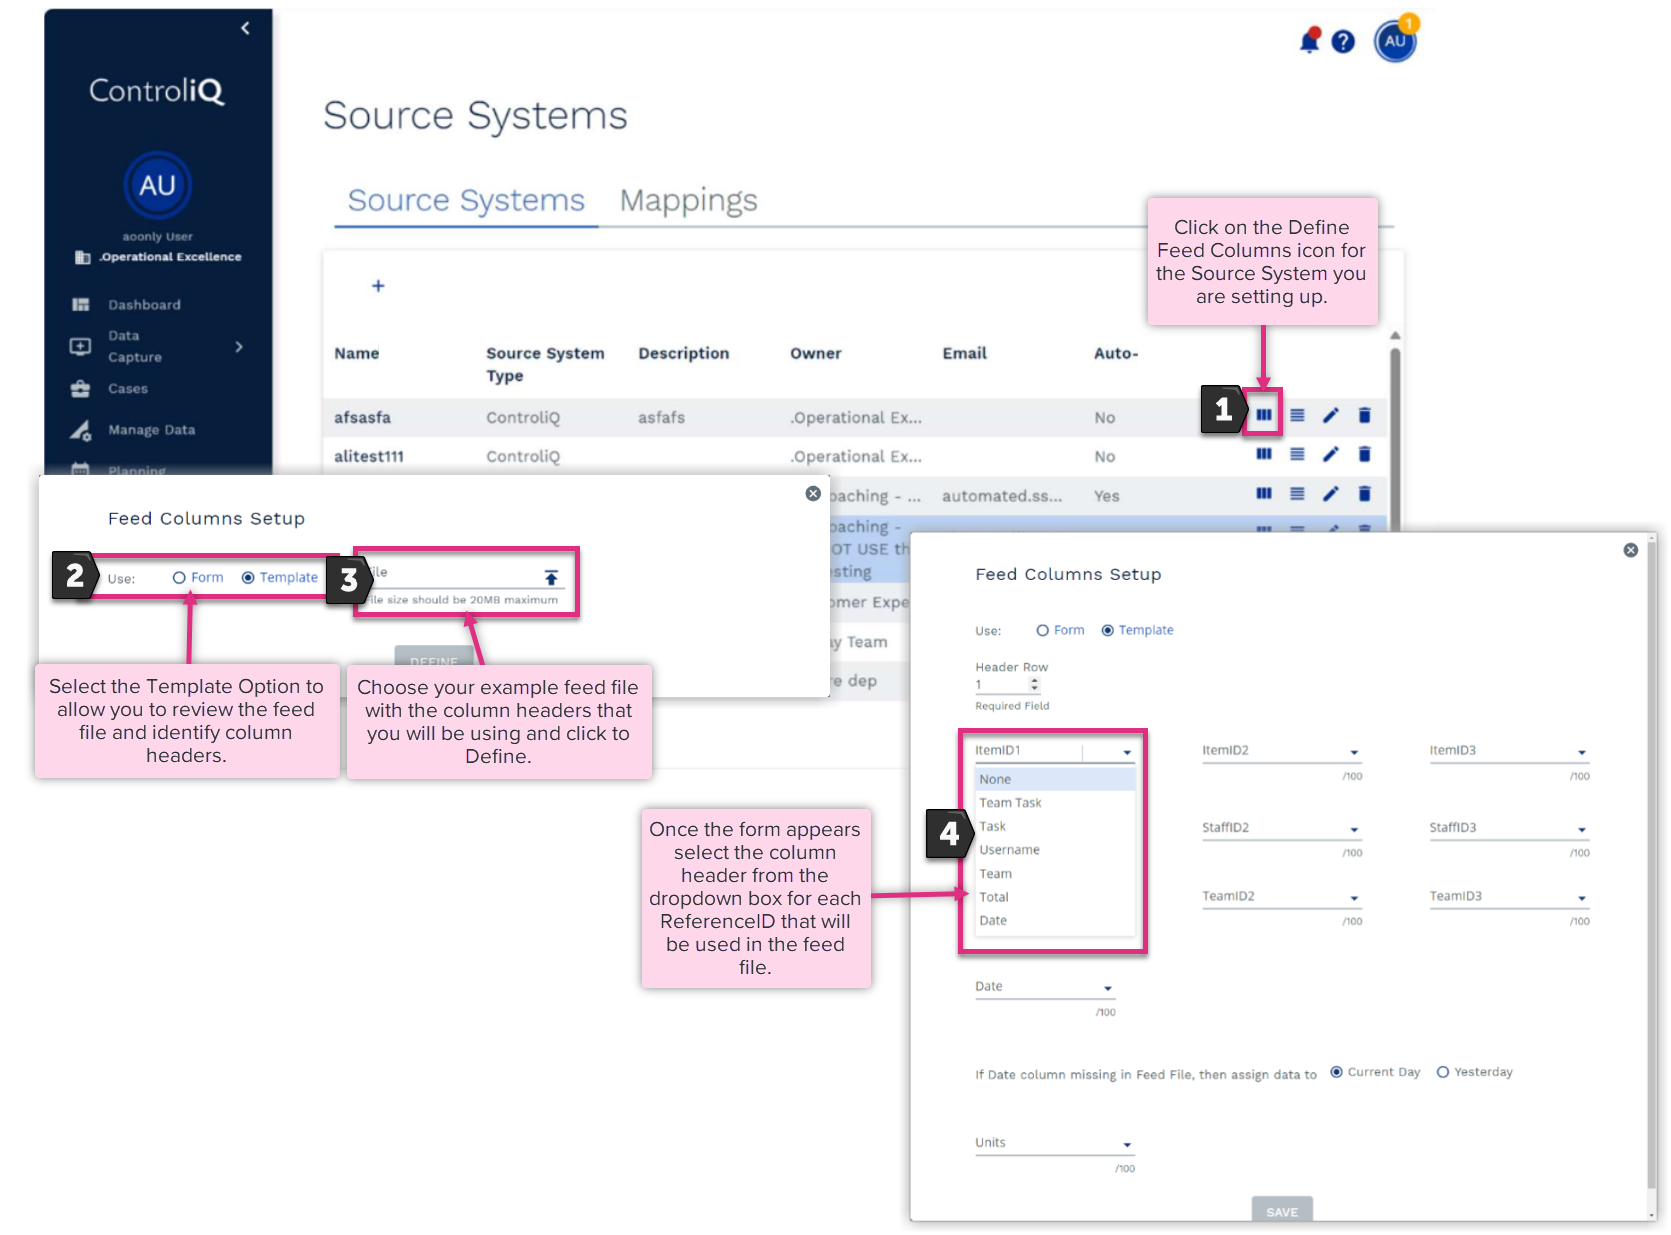
Figure 10. Using a template to define column headers
Once defined, the same screen will appear as in manually defining feed column headers, however, there will now be drop-down menus provided with the column header options from the feed file. You can then map the column headers from the uploaded file to the standard Connect column headers using the drop-down list.
Only data that is at or beneath the Owner level of the Source System can be mapped to that source system. For instance, if you Assigned the Owner of the source system to Department B in figure 1 then data belonging to Department C could not be loaded using that source system.
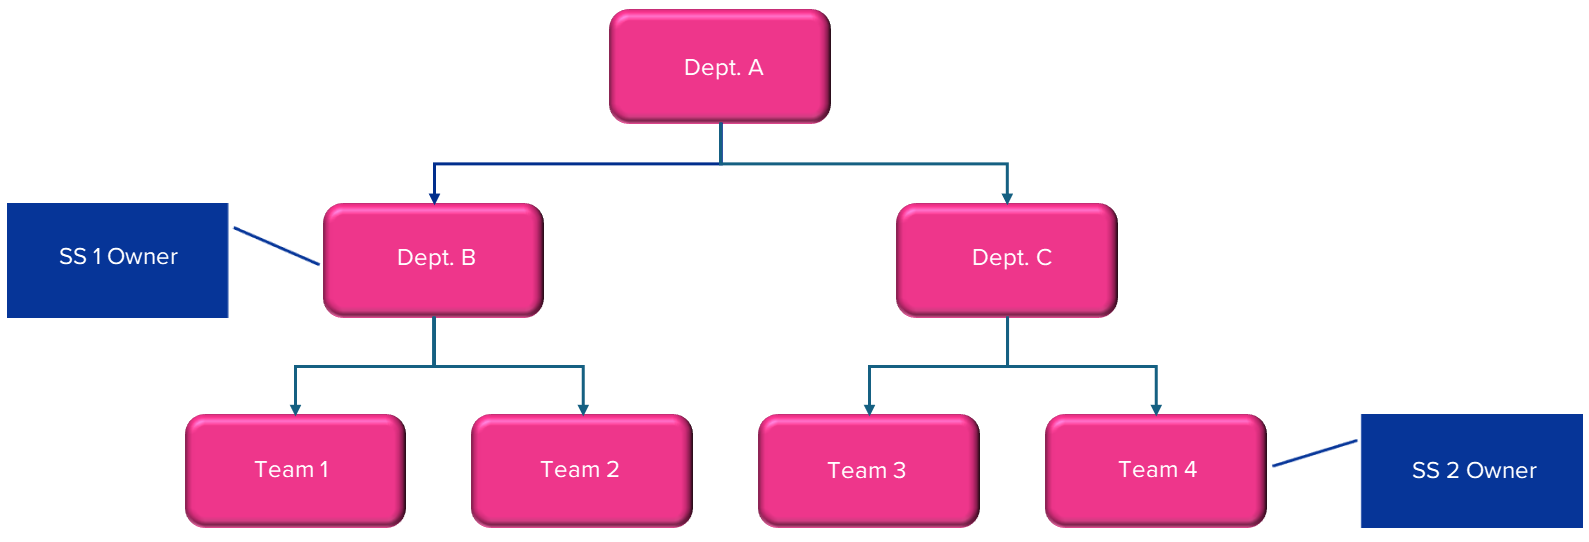
Figure 1: Source systems set at team or department
Considerations when setting up the source system include whether there is a likely hood of loaning and borrowing resources from other parts of the organisation. If the resources that are being borrowed belong to a part of the organisation that is not at or below the level of the owner, then it would not be possible to include them in the mappings for that source system.
If you want to load data for both Department B & C using the same source system, and mapping tables, you will need to set the source system Owner at Department A, as in figure 2.
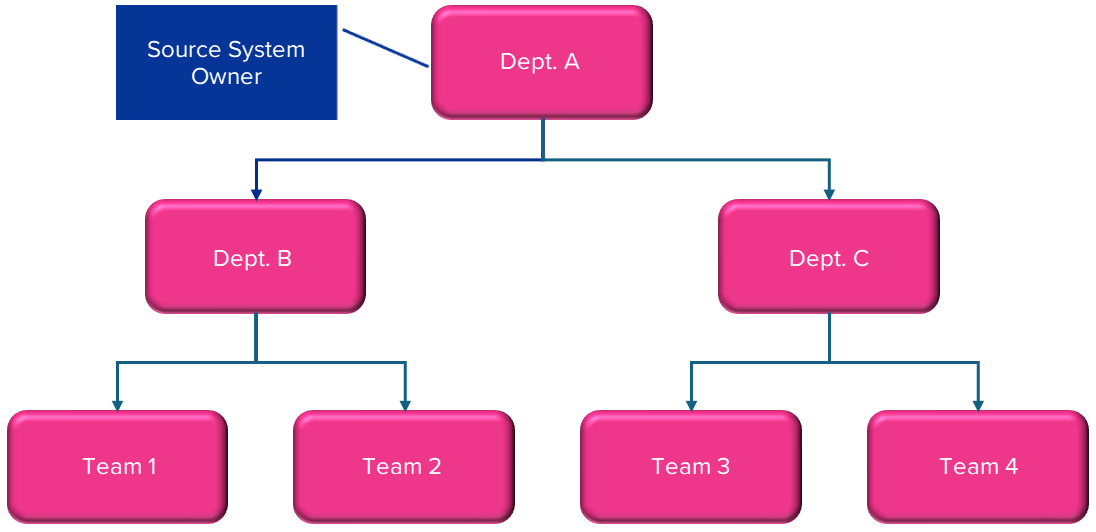
Figure 2. Source system set at highest level.
Setting the Owner at the highest level in the hierarchy gives maximum flexibility in mapping, However, there are two things to consider. First, by not limiting the scope of the source system, the available options to map to increase, thereby increasing the possibility of errors. Additionally, if you are manually loading files, you will also need to grant whomever is loading the files the permissions for that level of the hierarchy, increasing their access to unrelated Source Systems.
If you are manually loading for just one Team, for instance Team 4 in figure 1, and you have no need to consider loaning and borrowing from other teams, setting the source system owner to Team 4 would allow any user with Connect permissions for Team 4 to load the feed file, without visibility to any other Source Systems, eliminating potential confusion.
Other considerations include the use of Department level Tasks. As WIP or Work In for department level tasks are counted at the Department level, source systems to load this data would need to be set up at the Department level rather than a Team level.
When creating a new source system, make sure the Workgroup in the navigation menu is set at the level of or above where you will be assigning the Source System Owner. To change workgroup, select the current workgroup located under your Name in the top left of the screen and use the hierarchy or search to find and select the required workgroup.
Once the appropriate workgroup is selected, navigate to Admin > Data Integration > Source Systems. *Note, if you do not have the Admin menu, this would indicate that the appropriate role permissions have not been assigned to you to set up connect for the selected workgroup.
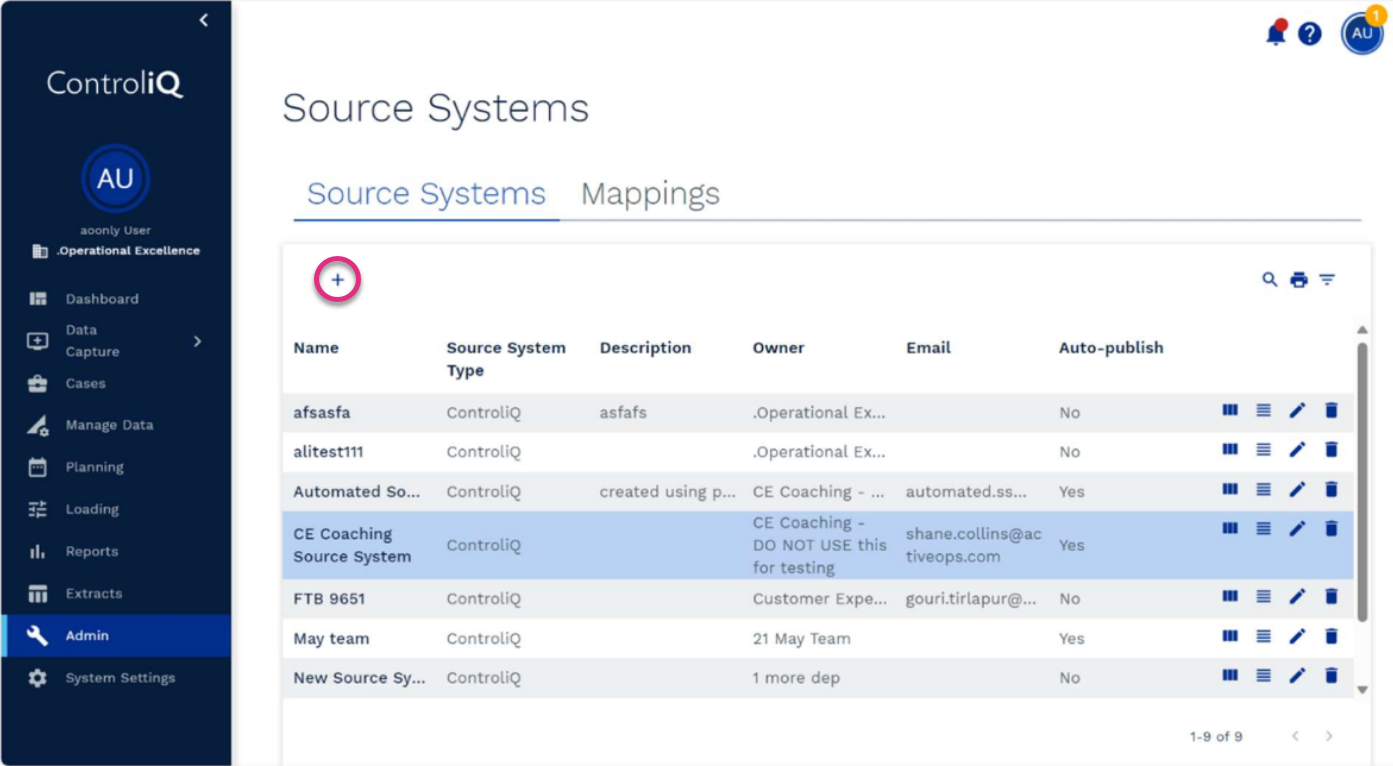
Select the ‘+’ icon, to add a new Source System. The follow the steps below to give ControliQ the instructions on how to handle the Feed File, as indicated below.
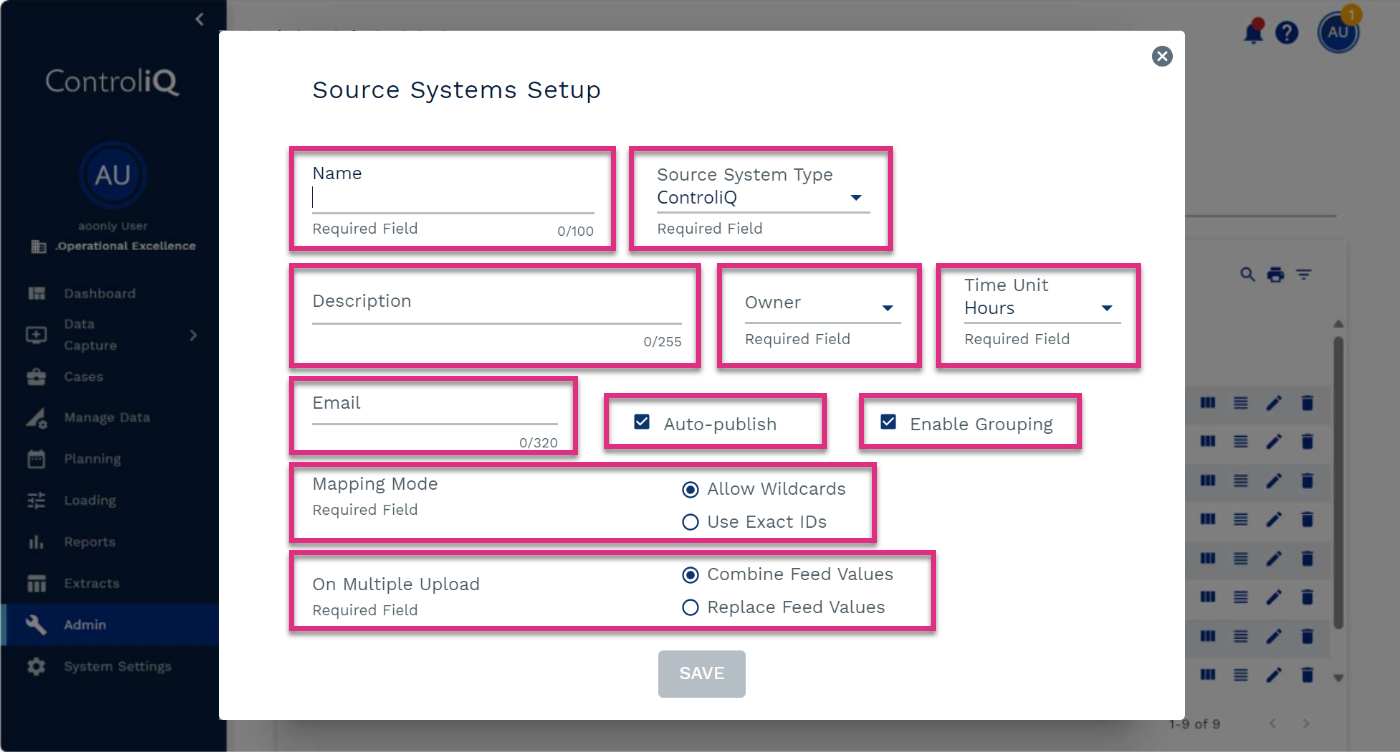
Name
Source System Type
Description
Owner
Time Units
Auto-publish
Enable Grouping
Mapping Mode
On Multiple Upload
|
The Define Feed Columns functionality allows you to assign the headers of the Feed File to the standard Connect column headers. This means that Connect can provide considerable flexibility with the layout of the Feed File format. The columns can be in any order and any spare columns of data can be ignored. This often allows for the use of existing extracts or reports with little need for customization for inclusion in Connect in ControliQ.
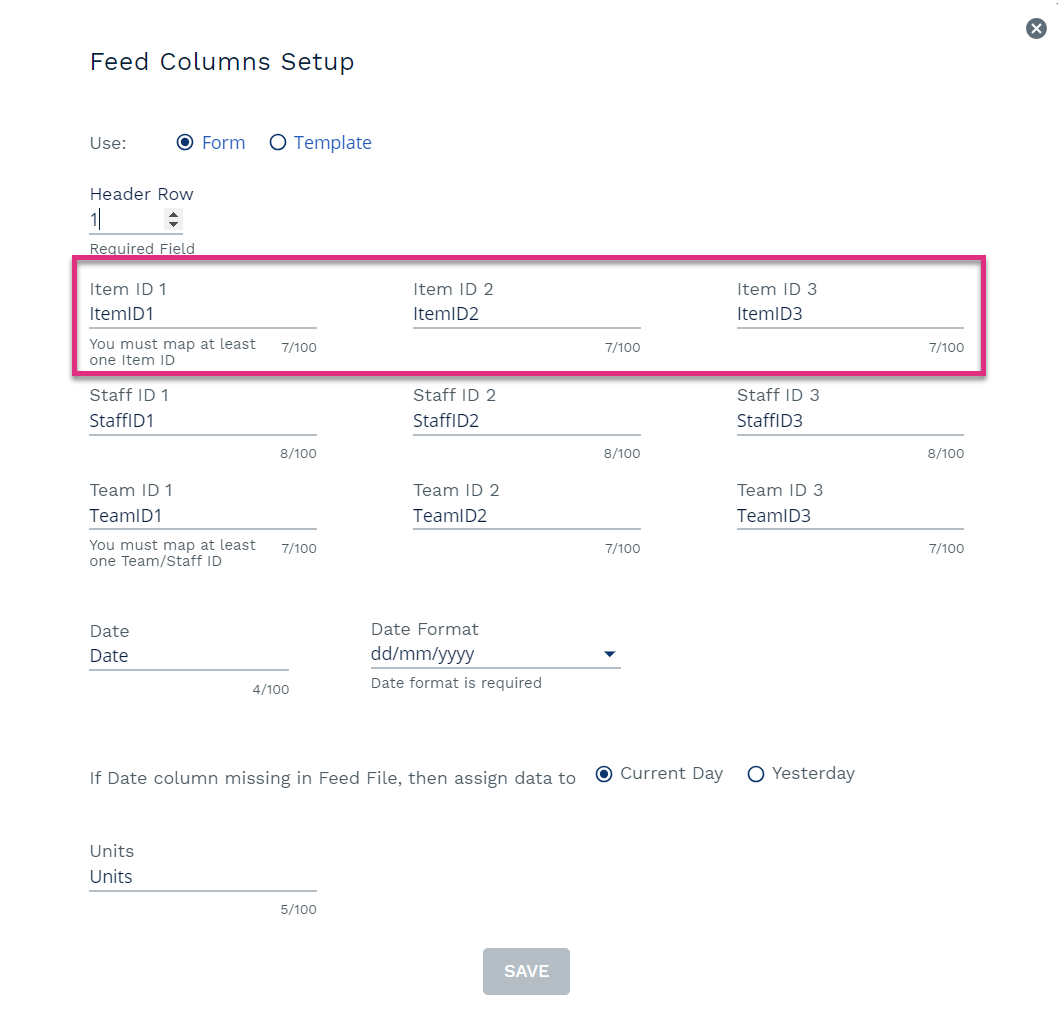
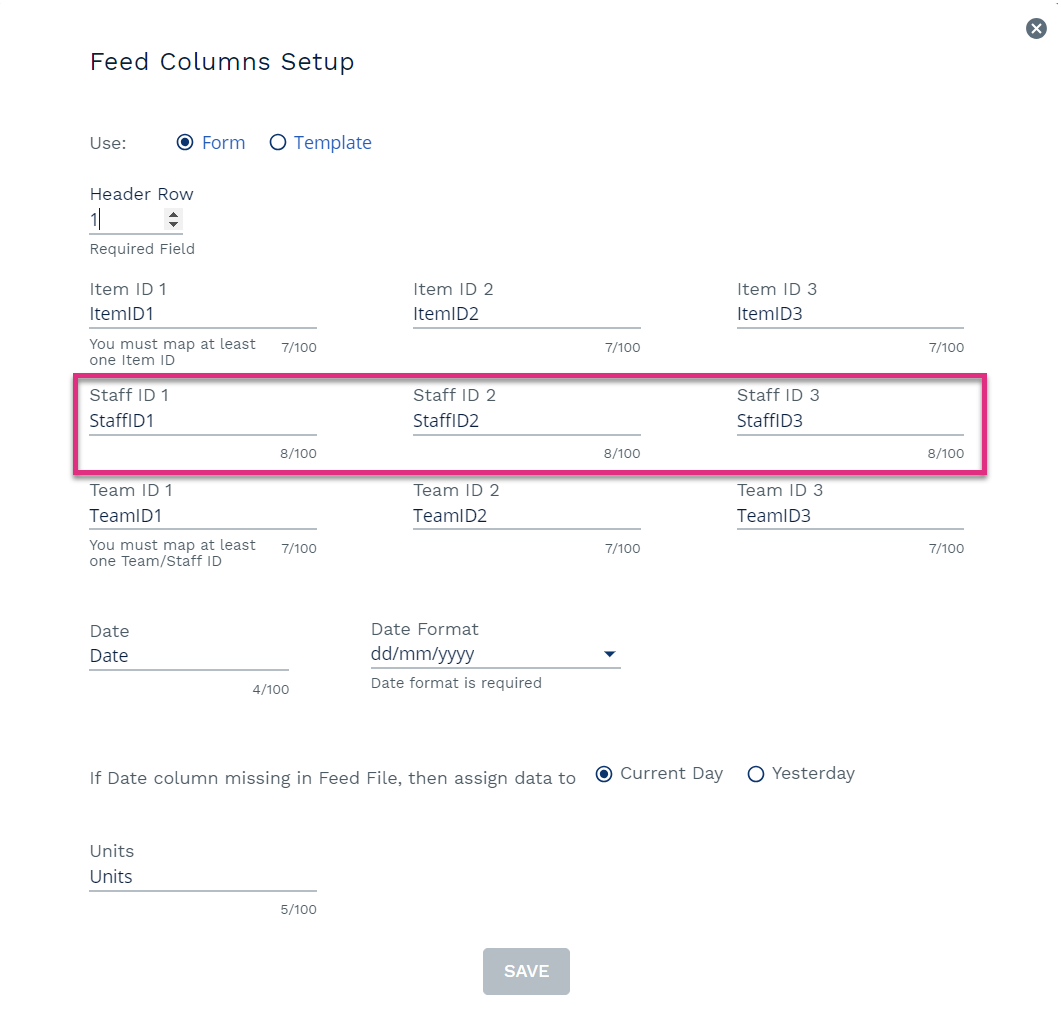
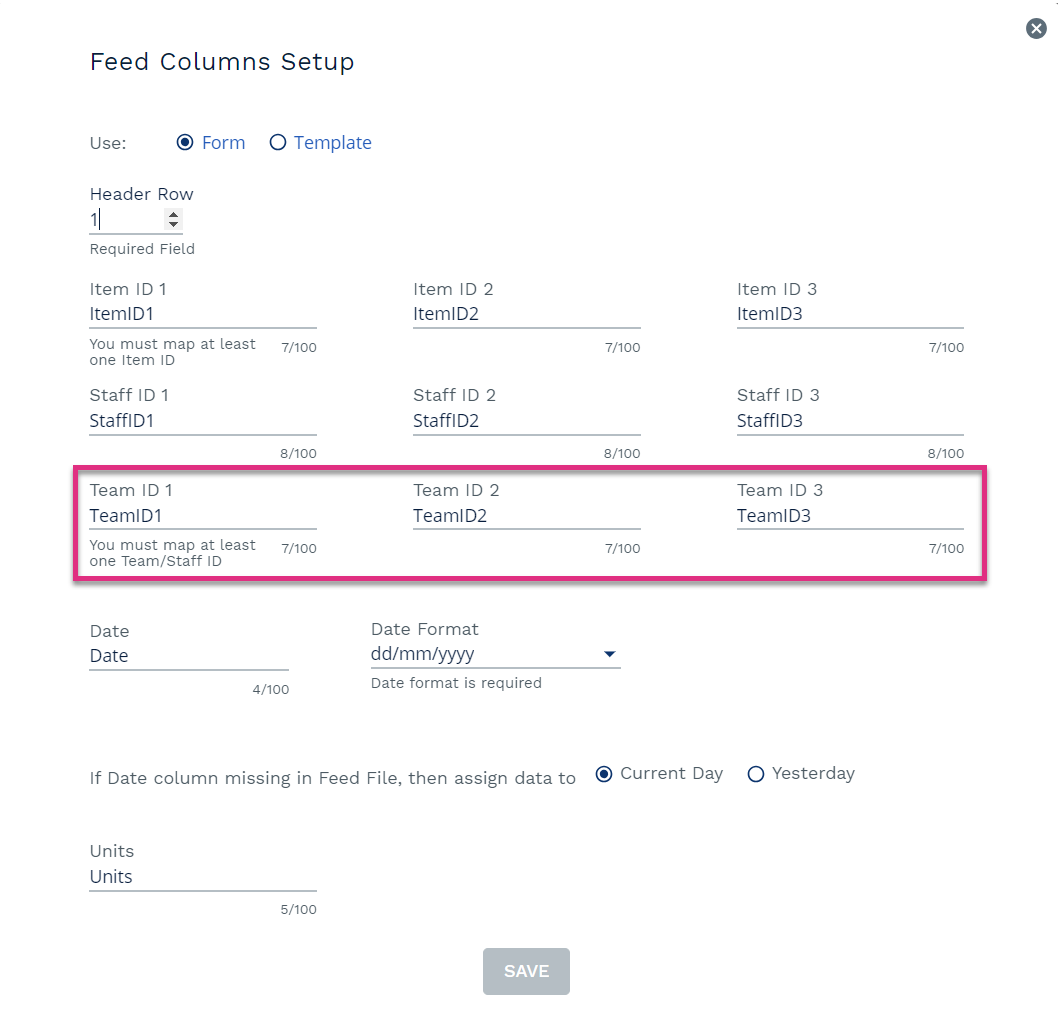
For each of the data types (Items, Staff and Teams) up to three columns of data can be used to identify your data. This feature allows you to take into account multiple factors that may, for instance, determine a unique task.
You will only need to use the number of columns of data that you require to identify your unique data, for instance if you use staff ID numbers to identity staff members, then you would only need to make use of Staff ID 1. If you staff member data is provided with a column for First Name and another Column for Last Name then you would need to make use of Staff ID 1 and Staff ID 2.
On some occasions it may be that you require more than 3 columns of data to identify your unique data, in these cases it would be advisable to concatenate columns of data at source.

In the Source Systems screen, select the relevant source system ![]() and click the Define Feed Columns button
and click the Define Feed Columns button ![]() .
.
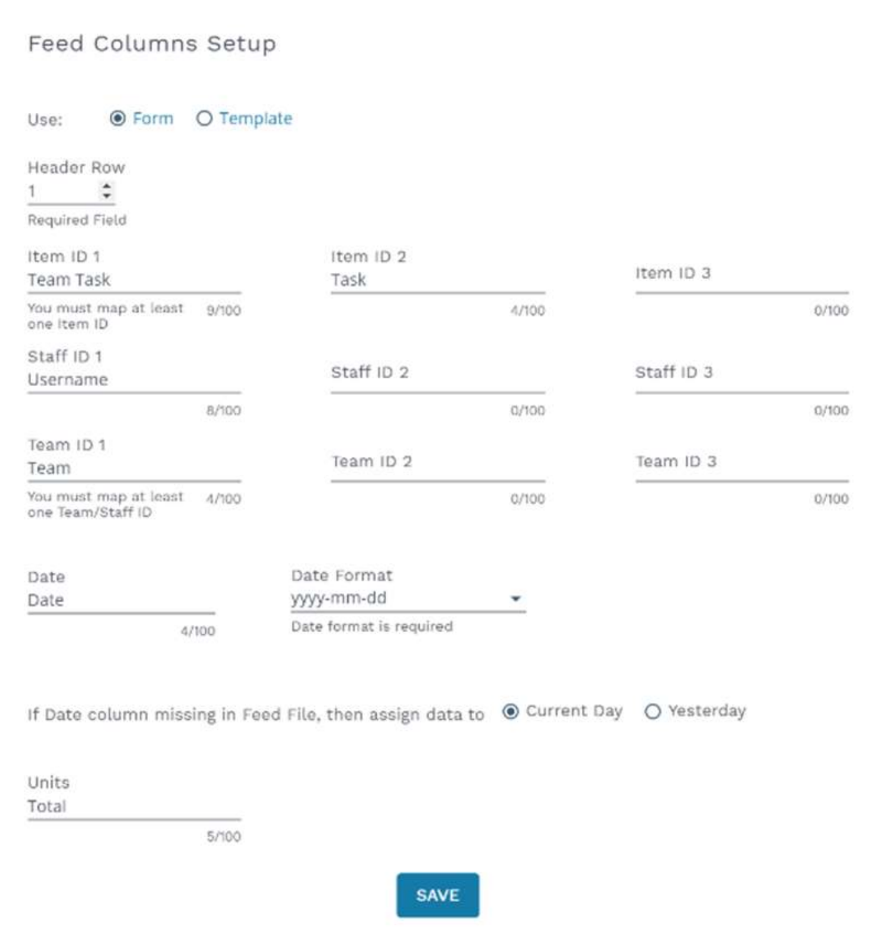
This opens a dialog box called Feed Columns Setup. Here you can enter the Feed File column headers manually with the Form option. Or you can choose to import a Template feed file by selecting the Template option.
|
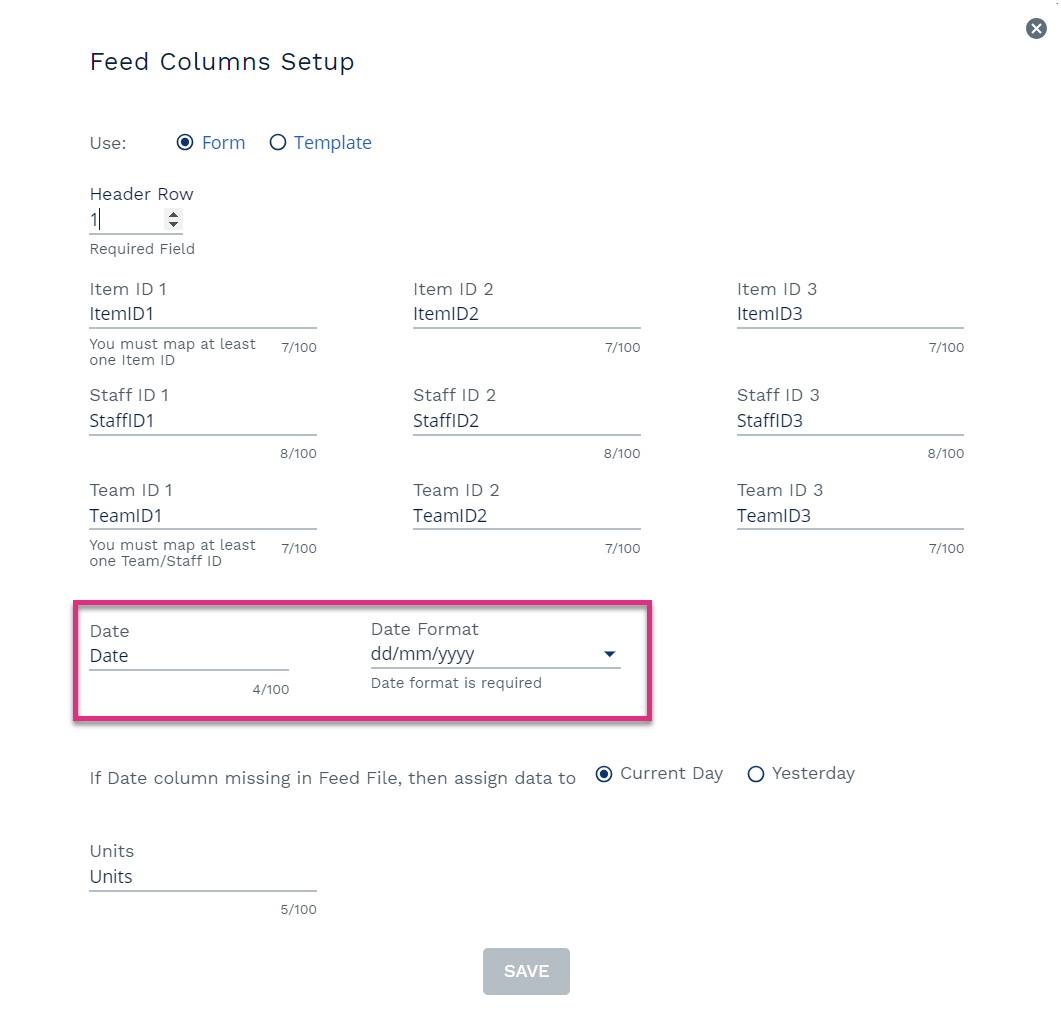
It is crucial that the format provided matches exactly to the format in the feed file to avoid future errors during feed file uploads.
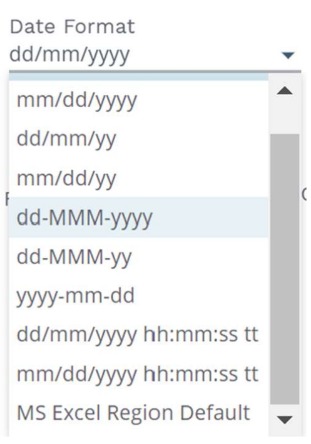
It is also important to note that if the month is reported using alphabetic characters, the month should be entered using capital ‘M’s, rather than lowercase, which would indicate a numeric value. For example, dd-MMM-yyyy would be 12-NOV-2020, whilst dd/mm/yyyy would be 12/11/2020.
When saved, the new date format will appear in the Map Feed Columns dialog box. Click Save to keep all changes made. This action will overwrite any previously defined feed column names, as well as the previous format for that source system. Connect allows only one format per source system, which is applied to all subsequent feed file uploads to the source system.
MS Excel Regional Default
This is a great option to use if you only intend to load data via Excel, and you may also have data being loaded from different geographical regions, that use different date format conventions. By default, Excel will set your date format to respond to regional date and time setting. These default date formats are prefixed with an asterix, for example *dd/mm/yyyy.
The correct date format to set your source system to, if you are going to load a date format with an asterix [regardless of whether the format is *dd/mm/yyyy or *mm/dd/yyyy], is MS Excel Regional Default.
It is important to note that this date format option will only work when loading Excel files, and not other formats such as .CSV. Additionally, if the date format in the Excel file is not prefixed with an asterix, Connect will not load the file when the MS Excel Regional Default date format is set for the source system.
| Note: If you have a defined date format set in your source system, such as dd/mm/yyyy, opening and saving a file in Excel may change the date format to the default Excel asterix format. Before you attempt to load an Excel file, you should check the date format that the date column is set to in Excel and change it if necessary to match your system date format. Alternatively, saving the file as a CSV should prevent the asterix format being picked up and saved. |
Figure 3 below shows an example of a typical feed file layout. The columns in the feed file do not need to be organised in the order shown in the example below as Connect relies on the column headers, but not their position in the feed file.
The data you are working with may not require this number of columns. You only need to include as many columns as required to describe each item of data, team, or staff member.
To begin mapping the source system’s feed file columns, Connect allows the user to either manually type in the column names, or import an existing feed file as a template.
The example feed file below will be used for our Demo System example in the following instructions for setting up a source system in ControliQ. The first three boxes explain how Connect will map the feed file columns to its standard columns.
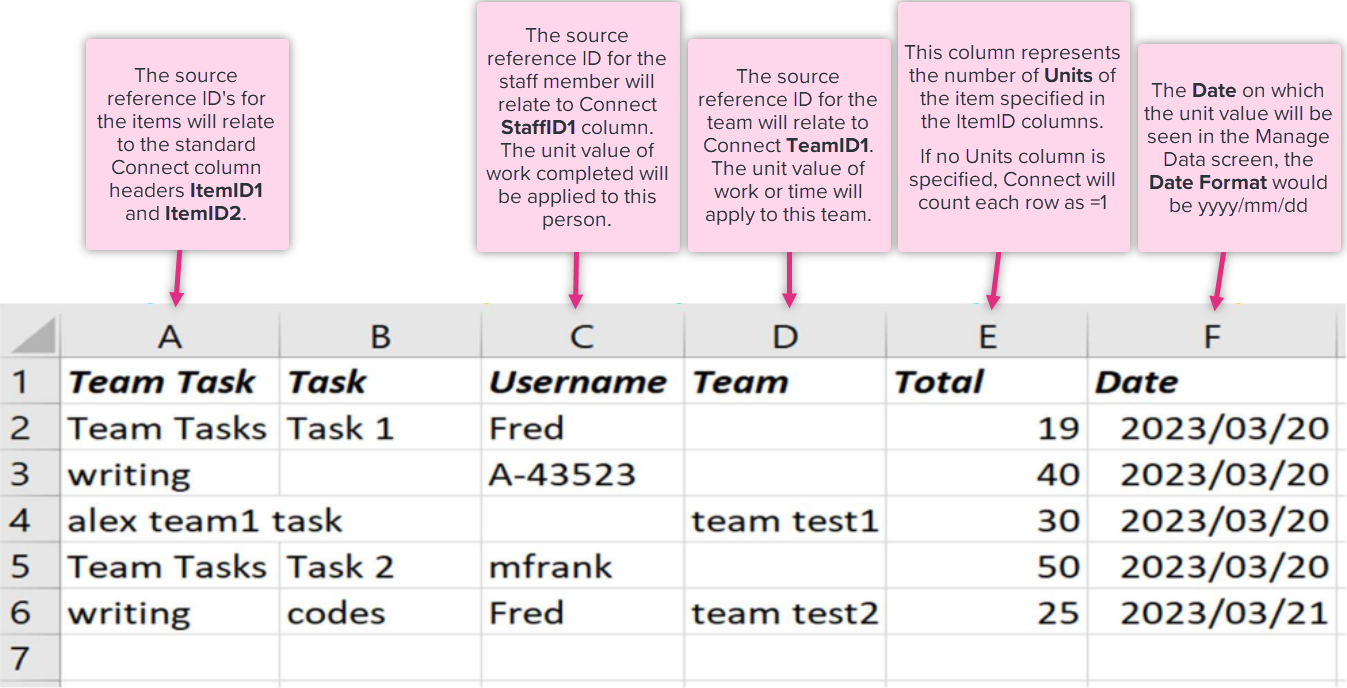
In the example above the source reference IDs are found in the first row therefore the Header Row in the feed columns set up would be set at the default “1”.
Note how some of the data uses two columns to identify the tasks, whilst others only require one column of data.
Where data is blank for either Username or Team, connect will apply the logic set out in Table 2 below to determine how to process the data. For example, row 4 will be treated as WIP or WI as the username column is blank for this row.
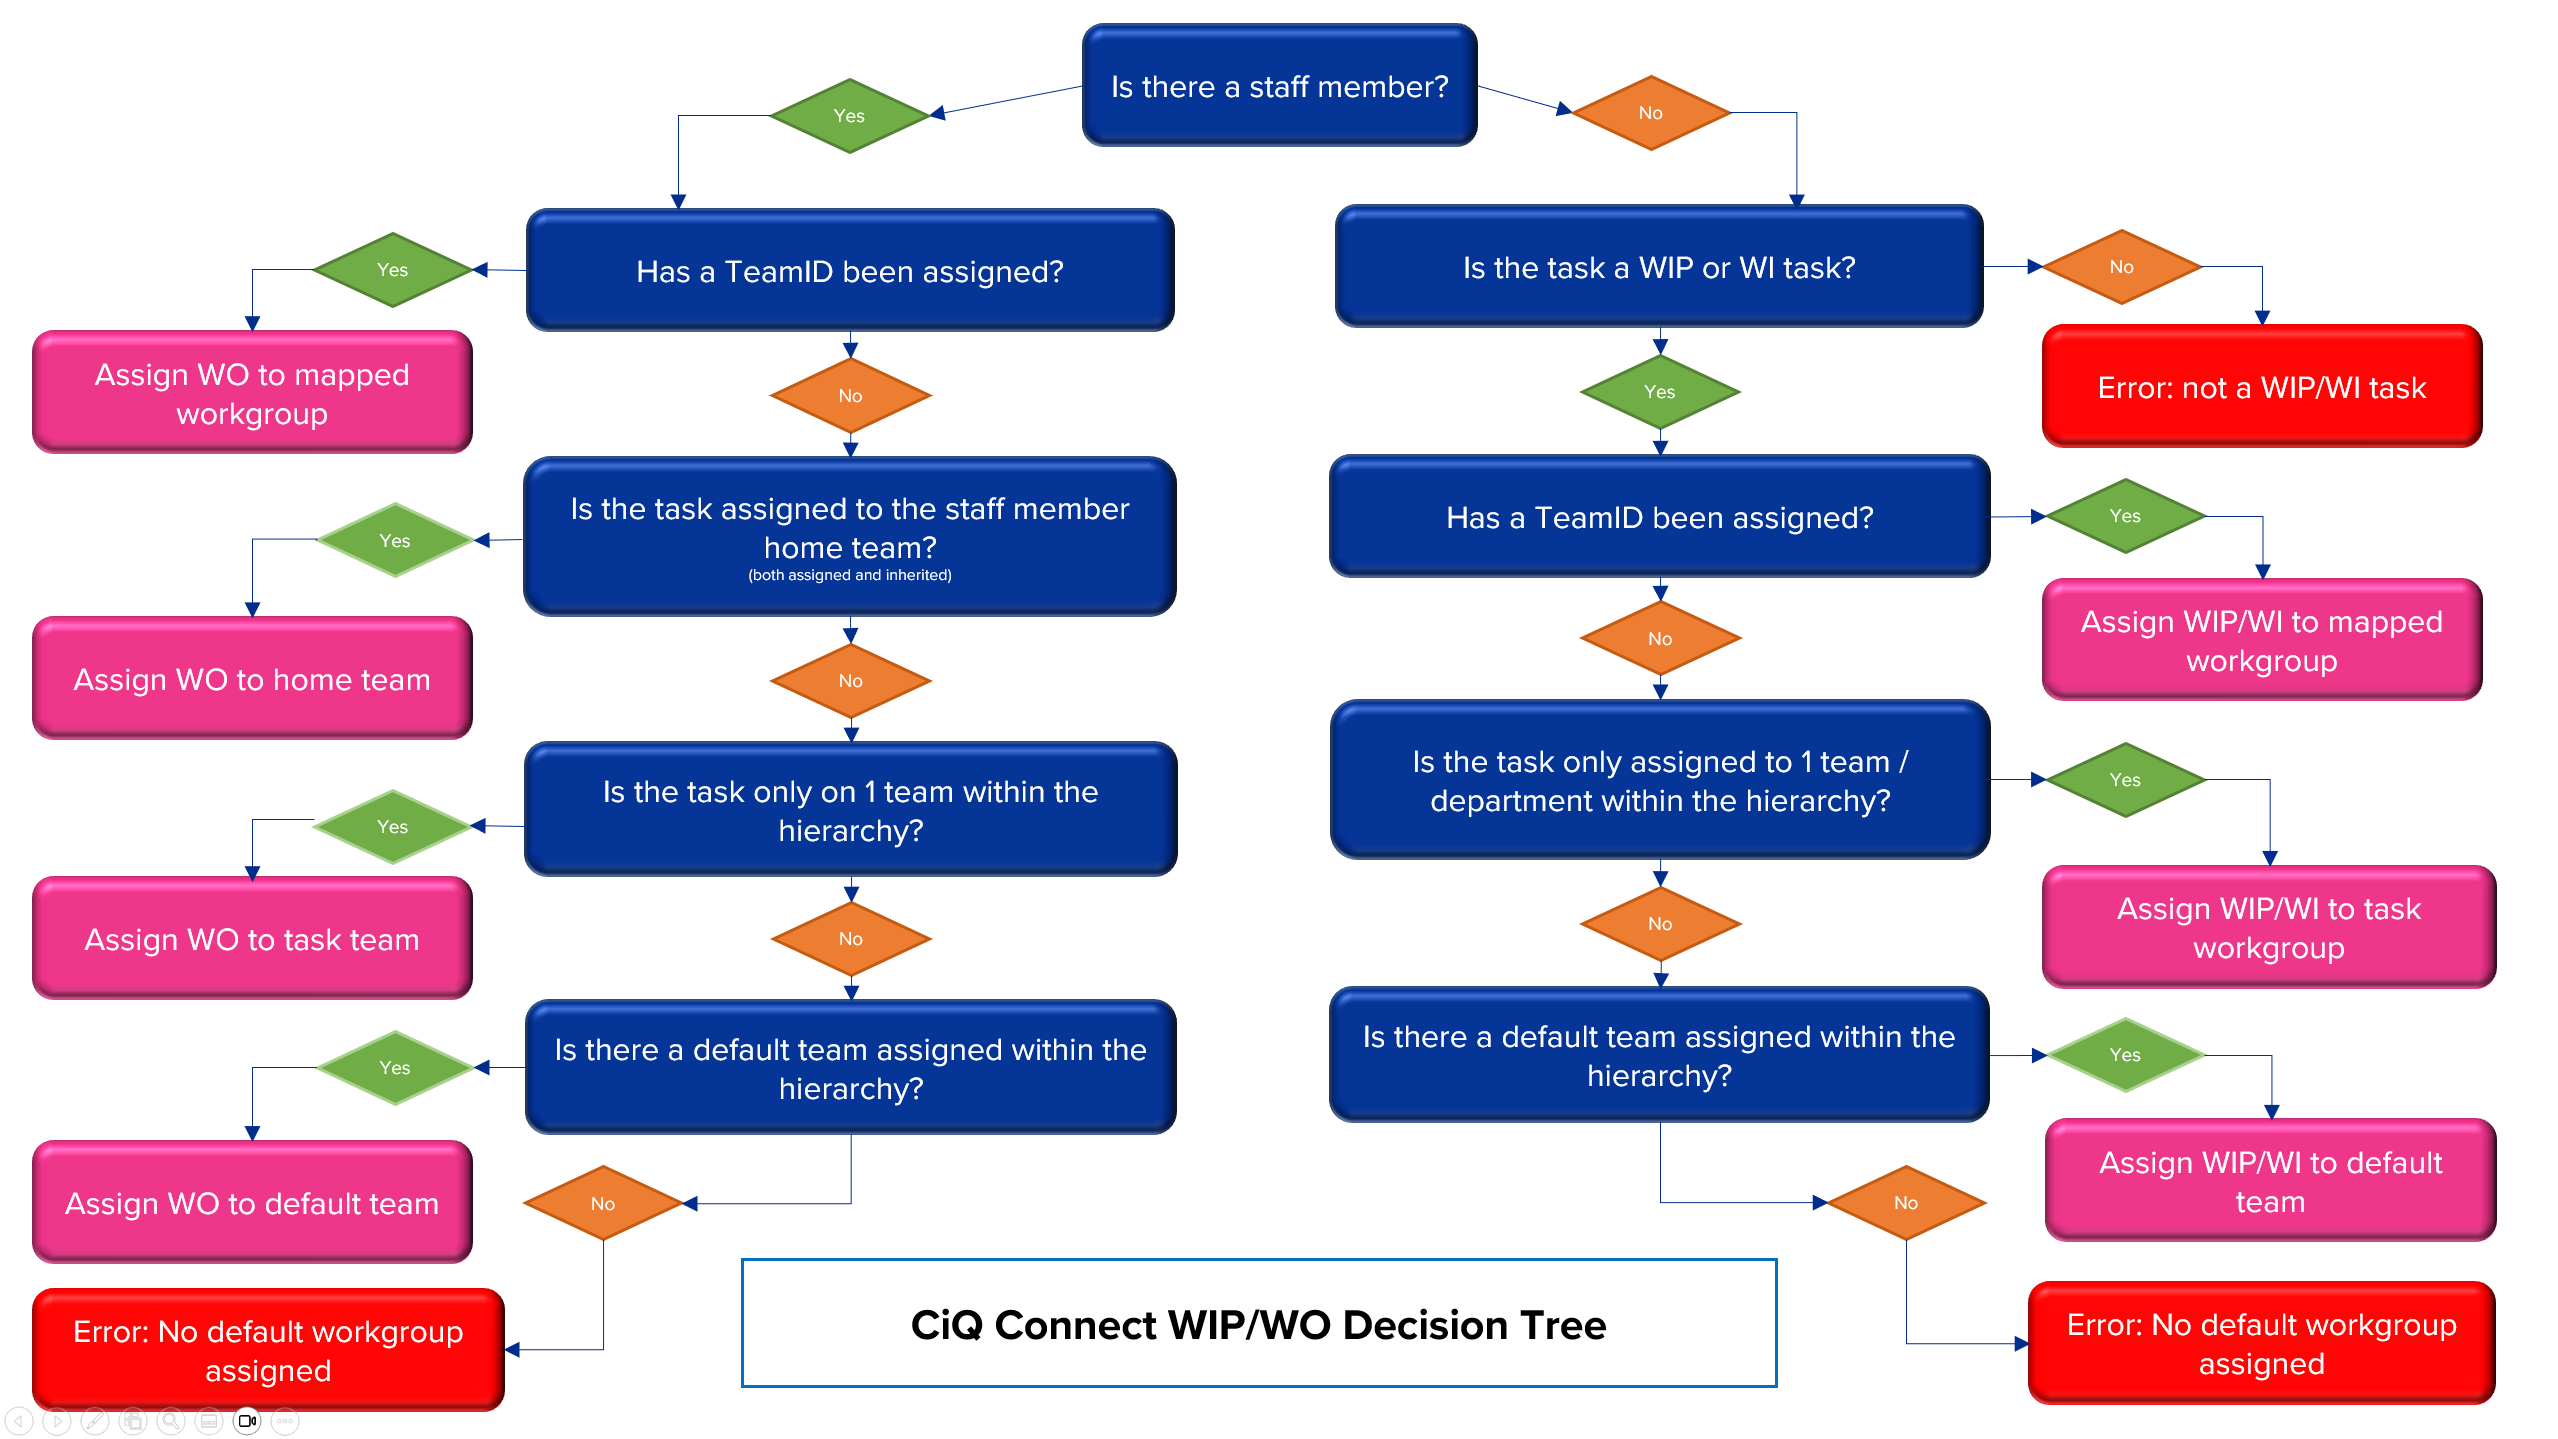
Table 2. Logic applied to feed file data.
| Note: To understand more about deriving data and default teams, see section below. |
To manually type in the source system’s feed column names, click Form on the Feed Columns Setup pop up. Connect displays the screen shown below, allowing you to type in the feed column names in the provided fields, as they relate to the standard Connect column headers. The Feed Column setup below has been completed for the example feed file in Figure 8. above.
When you first use the Form option to set up your feed columns, values will be populated with default values under each of the connect categories e.g., ItemID1, ItemID2 etc, you should replace these values with the column headers that will be provided on your feed file. You should clear the default values from any of the fields you will not be using otherwise you will encounter an error when you load your feed files.
Deciding on how many source systems you will require is dependent on the format and content of the data that you are creating, and how you wish the data to be treated for each of your separate feeds.
If you are loading data for Workout from two different systems and the column headers are different, for instance for the Tasks or Units, then you will need two source systems, as the directions for reading and handling files are unique for each Source System.
It is possible to have the same source system to load Work Out and Work-In-Progress / Work In, even if these are presented in different feed files. However, there are a couple of key considerations:
You will need to ensure that you either include a Team Identifier in the data or provide the WIP data with a blank entry for the staff member in the staff member column(s). If you load core task data without a staff member included, Connect will treat this data as Work-In-Progress [or Work In for Work In tasks]. See table 2.
Work-In-Progress and Work In data is typically fed on less frequent intervals than Work-Out and may also be set up to Replace rather than combine. If your work-out feed needs to be set up to Combine but the WIP needs to be set to Replace, then you will need two source systems.
Overview
The mapping functionality enables you to create relationships between the data from the Source System and ControliQ data, by assigning the Feed File references to ControliQ items.
The categories that can be mapped using Connect are as follows:
-
Core Tasks, including Work In (WI), WorkOut (WO) and Work-In-Progress (WIP)
-
Diverted Tasks such as Meetings and Training
-
Downtime such as Sickness and Annual Leave
-
Resources such as Overtime, Flexitime, Staff Complement, Lending and Borrowing
-
Staff Members
-
Workgroups
Data for Diverted, Downtime and Resources can be loaded for future dates, representing planned activities, however data for Core Tasks can only be loaded for past or current days.
Mapping allows you to express your data in a way that makes it easier to understand, for example by translating a Staff Member ID on an incoming feed file to a staff member name in ControliQ. A task with the name ‘inc’ in the source system can be mapped to the ‘Invoice Creation’ task within ControliQ.
The Mappings Screen
As with setting up source systems, mappings can be accessed following the Admin > Data Integration > Mappings path. You are also able to navigate to the mapping screen from the source system page using the individual source system navigational buttons or the mappings tab at the top of the page.
Once there, maps can be created from the Mappings screen by clicking the + button to create a single map at a time. This is great for mapping small files or updating existing maps. However, source systems can have thousands of entities to map. In ControliQ, Mappings can also be easily created and uploaded from an Excel file.
-
Begin by selecting a Source System, using the drop-down arrow.
-
Click the + button to create a new map.
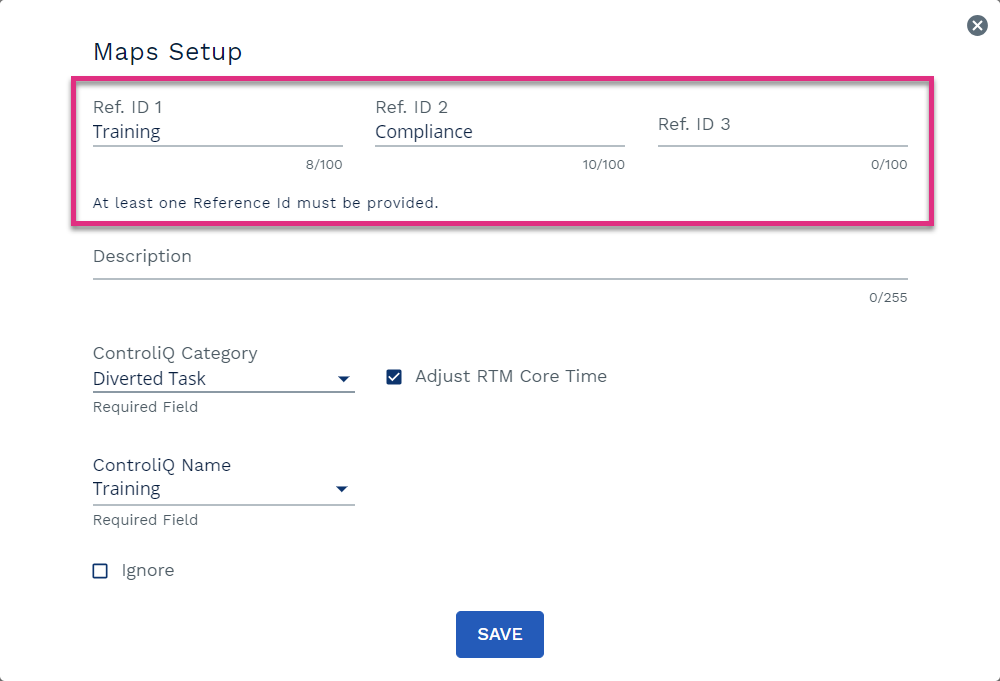
Ref ID's
enter the reference ID(s) from the feed file.
When using multiple reference IDs, these must be entered in the order of the column headers defined in the Source System setup.
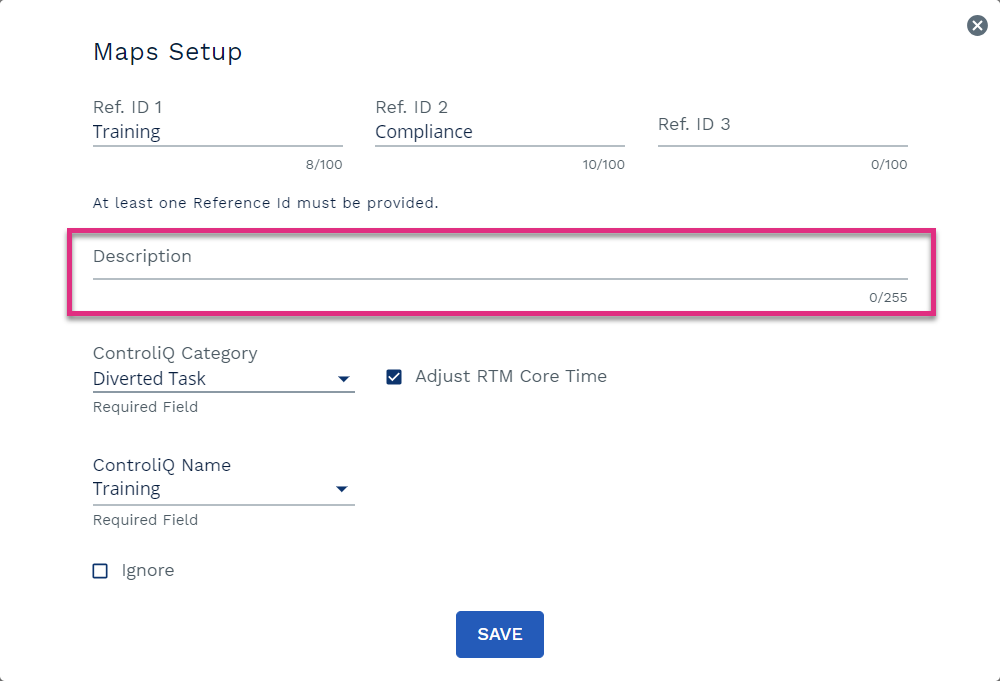
Description
This can be useful to either provide additional fields to sorting and filtering mapping exports or to provide additional context for others who are viewing mapping decisions.
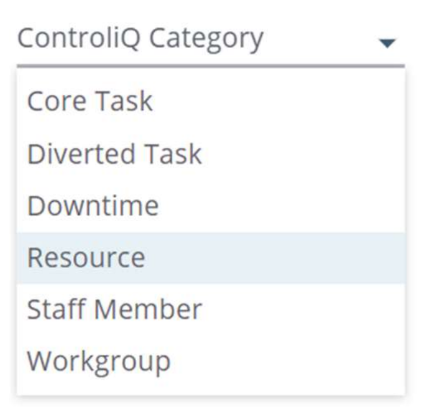
ControliQ Category
Select the ControliQ Category to which it corresponds.
Mapping links a data reference in the feed file to a specific ControliQ Category and ControliQ Name. ControliQ Categories are below:
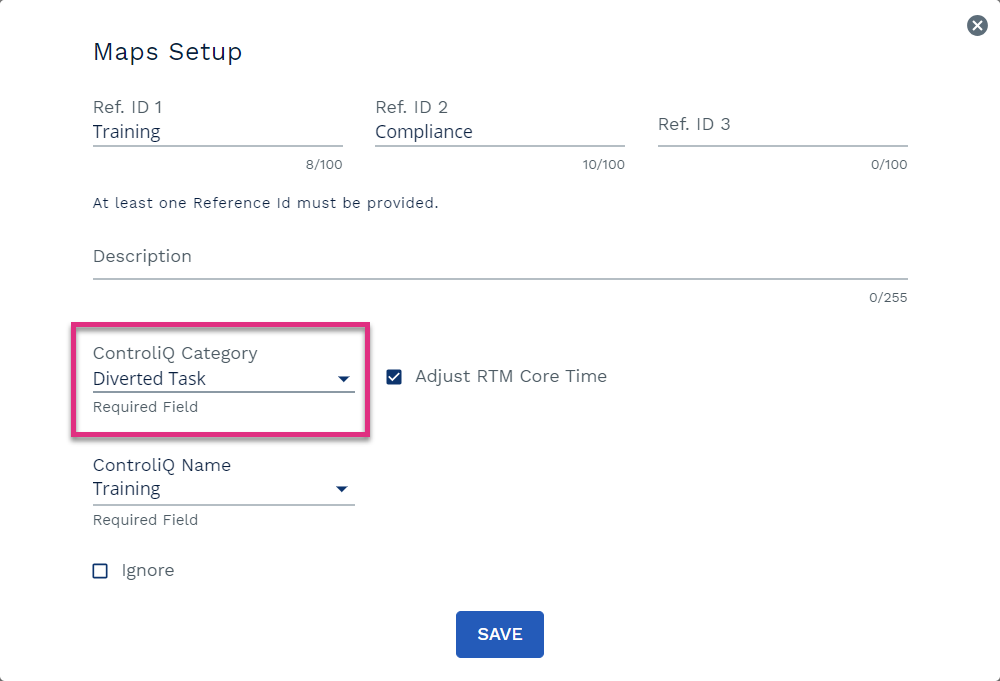
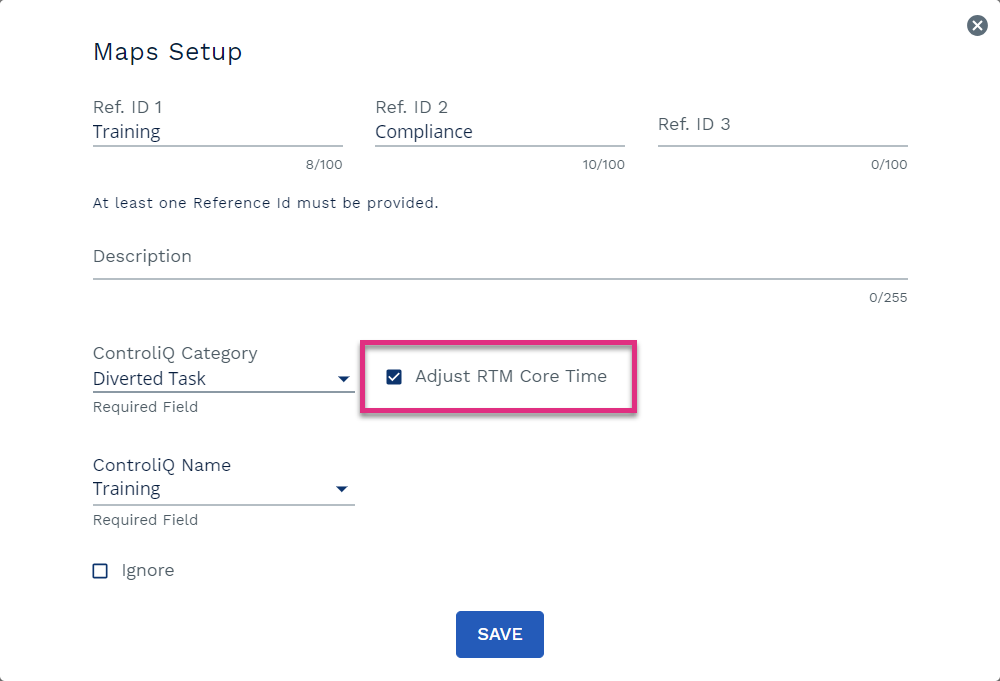
Adjust RTM Core Time
Only visible when mapping Diverted or Downtime (figure 12 below). If you are using Connect to feed Diverted Tasks or Downtime and you are also using RTM to capture data, this feature allows you to decide how you would like to account for the time loaded via Connect . If you check the Adjust RTM Core Time box ControliQ will reduce Core Time equivalent to the time loaded via connect for that specific mapping. If you do not check this box Core Time will remain unaffected and the total time worked will increase equivalent to the time loaded via connect against that mapping.
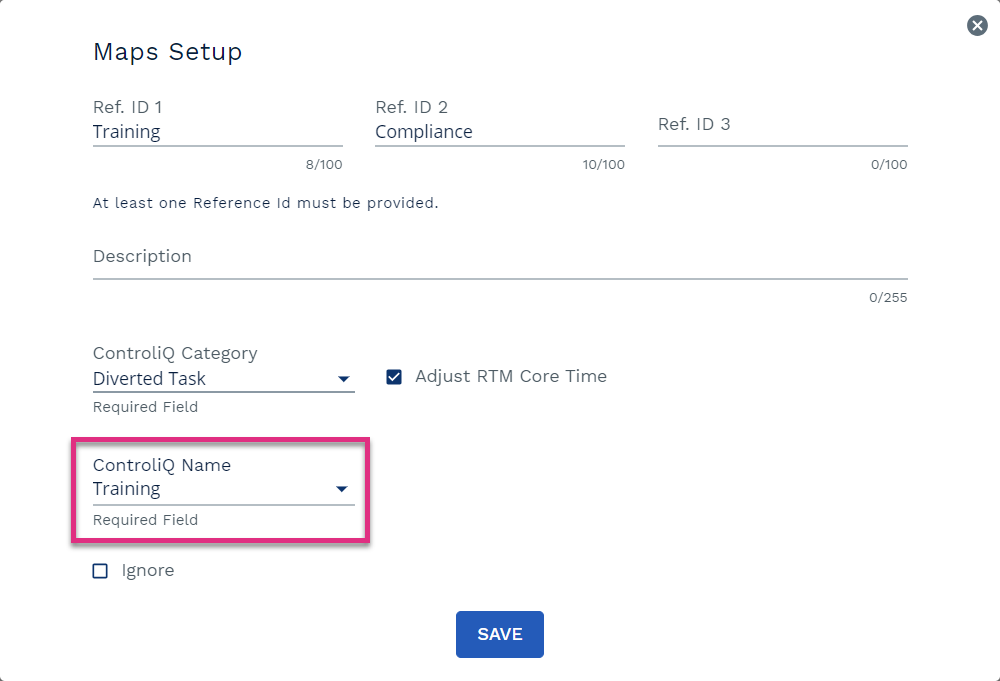
ControliQ Name
ControliQ Names will be available for mapping based on the items, teams, and staff members assigned at or below the level in the hierarchy of the Source System Owner. Each source system reference ID, that will be received from a feed file, needs to be linked to the associated ControliQ Name to avoid exceptions when loading the feed file. Source system reference IDs can be associated with any ControliQ category listed above.
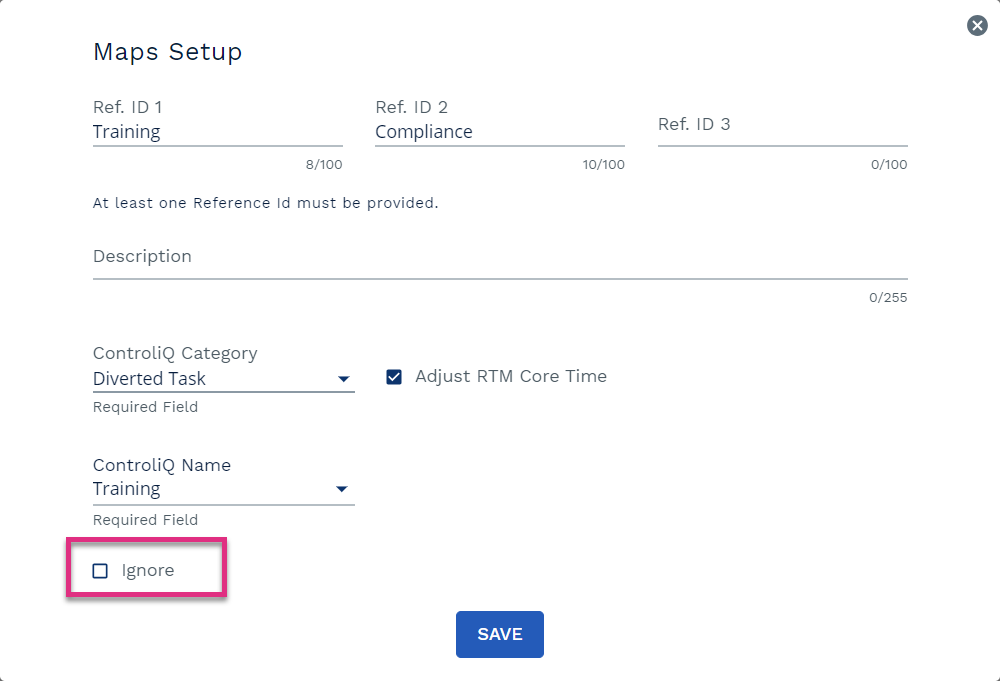
Ignore
Often there are references within a Feed File that do not need to be mapped. If no mapping is found, they will report as an error. It is always best to minimize the number of ignored references from the Feed File to improve processing. However, when required, it is important to map all references, and actively choose to ignore those references that should not be counted in ControliQ. This will keep exception reporting clear to ensure mapping is always accounting for all values found in the Feed File.
Hit save. Repeat the process for all remaining references from the feed file.
Include Unassigned Staff Members: Only visible when mapping Staff Members. Rarely needed, but on occasion it is necessary to make a map before a staff member starts or after the staff member has moved teams or left. In this case, clicking the include unassigned staff members will add any unassigned staff members in ControliQ to the list of possible mapping references in the ControliQ Name dropdown when mapping to a Staff Member category.
|
Note: all ControliQ Names must be setup in the admin function before they will be available for mapping. Unassigned Staff Members are only available to be included through manual mapping. |
|
Note: Adjust RTM Core Time is only available to be turned on through manual mapping. All mappings uploaded through the template will default to unchecked, but can be manually edited in the mapping screen after upload by clicking the edit pencil next to the individual mapping for which you would like Connect to adjust Core Time. |
Begin by downloading the mapping Template(a) and ControliQ Names(b) from the top right of the mapping screen.
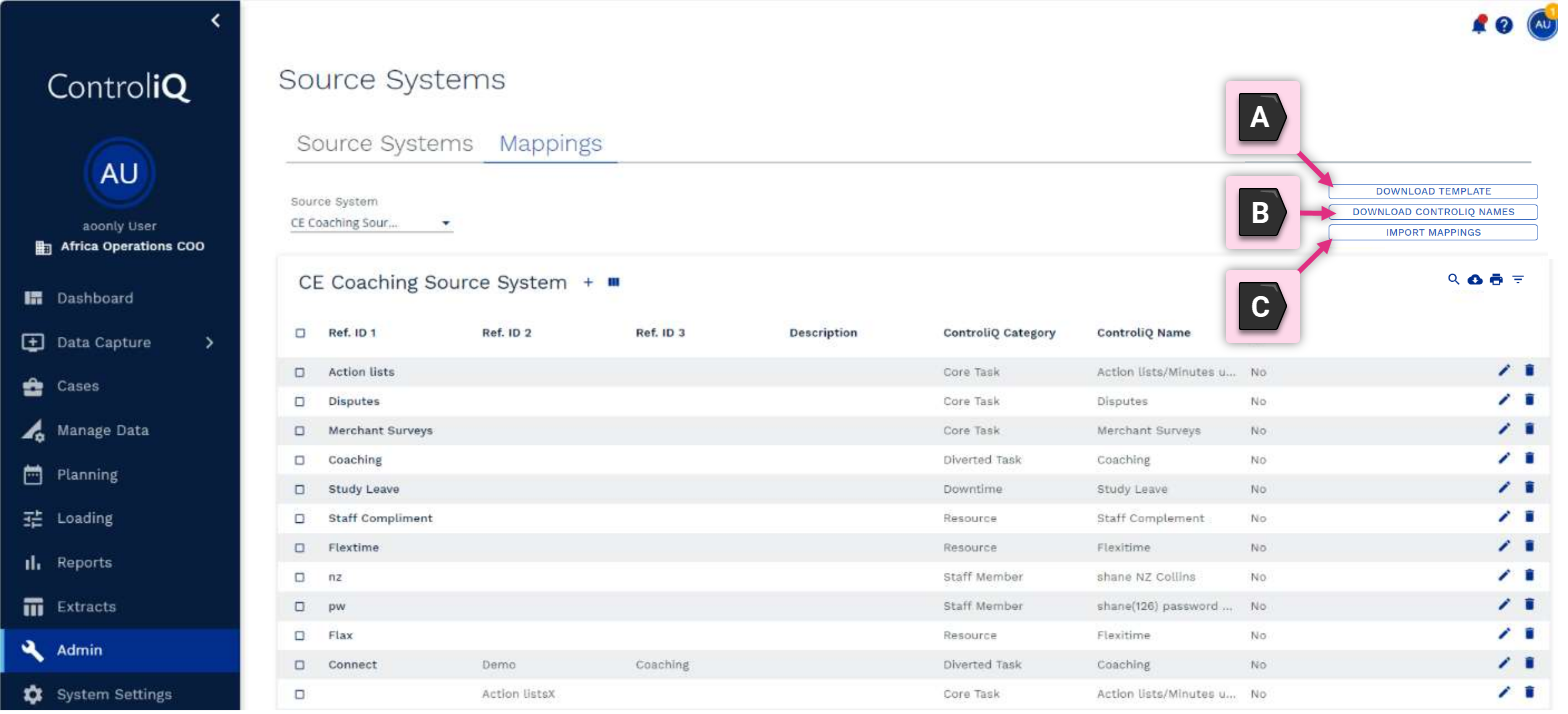
Figure 14. Mapping from a template resources in ControliQ
Within the Mapping Template Assign each source system reference ID to the ControliQ Category and Name. Indicate whether the Ref ID should be ignored. (Yes to ignore, No to load).
Using the Demo System data from before, you can see how the Reference IDs from the source system are mapped to the Categories and Names in ControliQ.
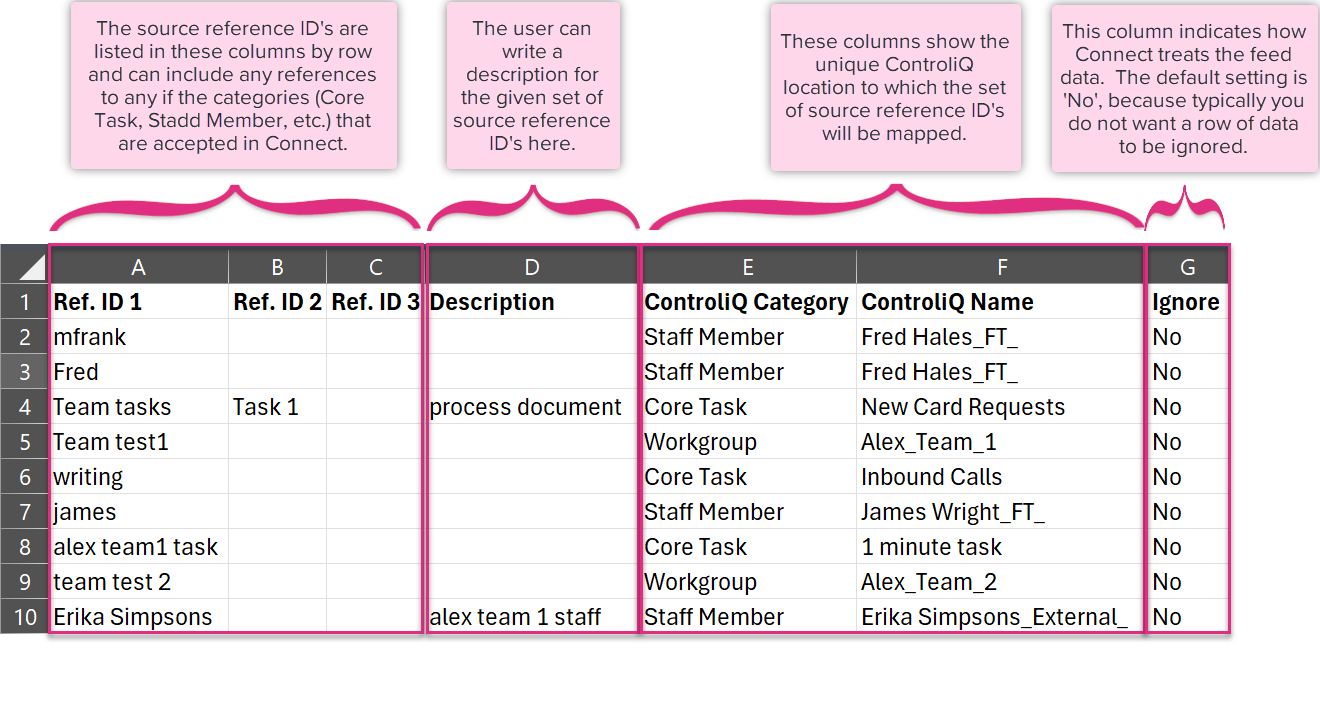
When you have completed your mapping template, upload the template using the import mappings (c) button on the top right of the mappings screen.
Many-to-one mapping
Mapping in ControliQ allows two or more source references to populate to a single ControliQ item, known as a ‘many-to-one’ mapping relationship. Many entities in the source system can all point to one entity in ControliQ (many-to-one mapping).
An example of ‘many-to-one mapping’, would be that all the following tasks from an incoming feed file can be mapped to the ‘Invoice Creation’ task within ControliQ:
-
‘On-line invoice’,
-
‘Telephone invoice’,
-
‘Emergency invoice’,
-
‘Re-issued invoice’.
However, the mapping of a single source item to many ControliQ items is not supported (which would be a ‘one-to-many’ mapping relationship). Where a single column of data from the incoming feed file is not sufficient to identify a unique ControliQ item, the use of a second or third feed file column of data could be considered.
Mapping using multiple feed file columns.
References from up to three columns from the feed file can be used to identify a single item in ControliQ (this should align with the column headers as defined in the source system setup). The source system references, exactly as they appear in the feed file, are then assigned to the ControliQ Category and Name to which connect should upload the data.
Wildcards
When loading data that requires more than one column of data to identify a specific ControliQ item, allowing wildcards in the source system setup can significantly reduce the number of mappings required and therefore the time required to create and maintain mappings.
Using Wildcards reduces the number of mappings required as ControliQ can map multiple items using just a single column of data where this is appropriate, whilst also allowing you to consider specific values from a second [or third] column only when this is relevant.
For example, you may have a column of data that provides the Tasks that are processed, and second column that identifies another attribute of the processed work, for example the US State that relates to the task that was processed.
For 48 of the US states the time to create invoices is the same and they can all be mapped to ‘Invoice Creation’, but for 2 states the work is more complex and would need to be mapped to a different ControliQ Task ‘Complex Invoice Creation’.
Using Wildcards, you would not need to include the 48 states that are not relevant in your mapping, just two states where this makes a difference. Effectively you would be instructing ControliQ to only consider data from the second column where you have indicated it is relevant, in all other cases data from the first column only is sufficient.
A key consideration when using Wildcards is to ensure that you have considered all potential combinations of data that will occur. All the combinations that are relevant to include in a specific mapping need to be mapped, if a new value appears in the second column which is a combination that is not specifically mapped, then the Wildcard mapping will only consider the value of the first field.
| Note: ControliQ will read the columns in the order that is set in the source system – define column headers. Therefore when using Wildcards it is essential that the column headers are defined in the order of the most to fewest references that need to be mapped. In this example, the column header for the task, Invoice Creation, would need to be defined as ItemID1 and the column header for the US State would be defined as ItemID2. |
Using Exact IDs
When multiple columns are used to map task Using the Exact IDs option means that, unlike Wildcards, you must map all possible combinations of data expected from the two columns of data.
Following the example used for Wildcards, if Exact IDs were used you would need to include all 50 US states in the Mapping, mapping the combination of the Task ‘Invoice Creation’ and 48 of the states to ‘Invoice Creation’ and the combination of the other two states and the same task to ‘Complex Invoice Creation.’
Data can be uploaded to Connect either manually or automatically. To import a feed file manually, from the menu on the left of your screen, select Data Capture, and then Upload (alternatively, you can select Admin > Data Integration > Upload).
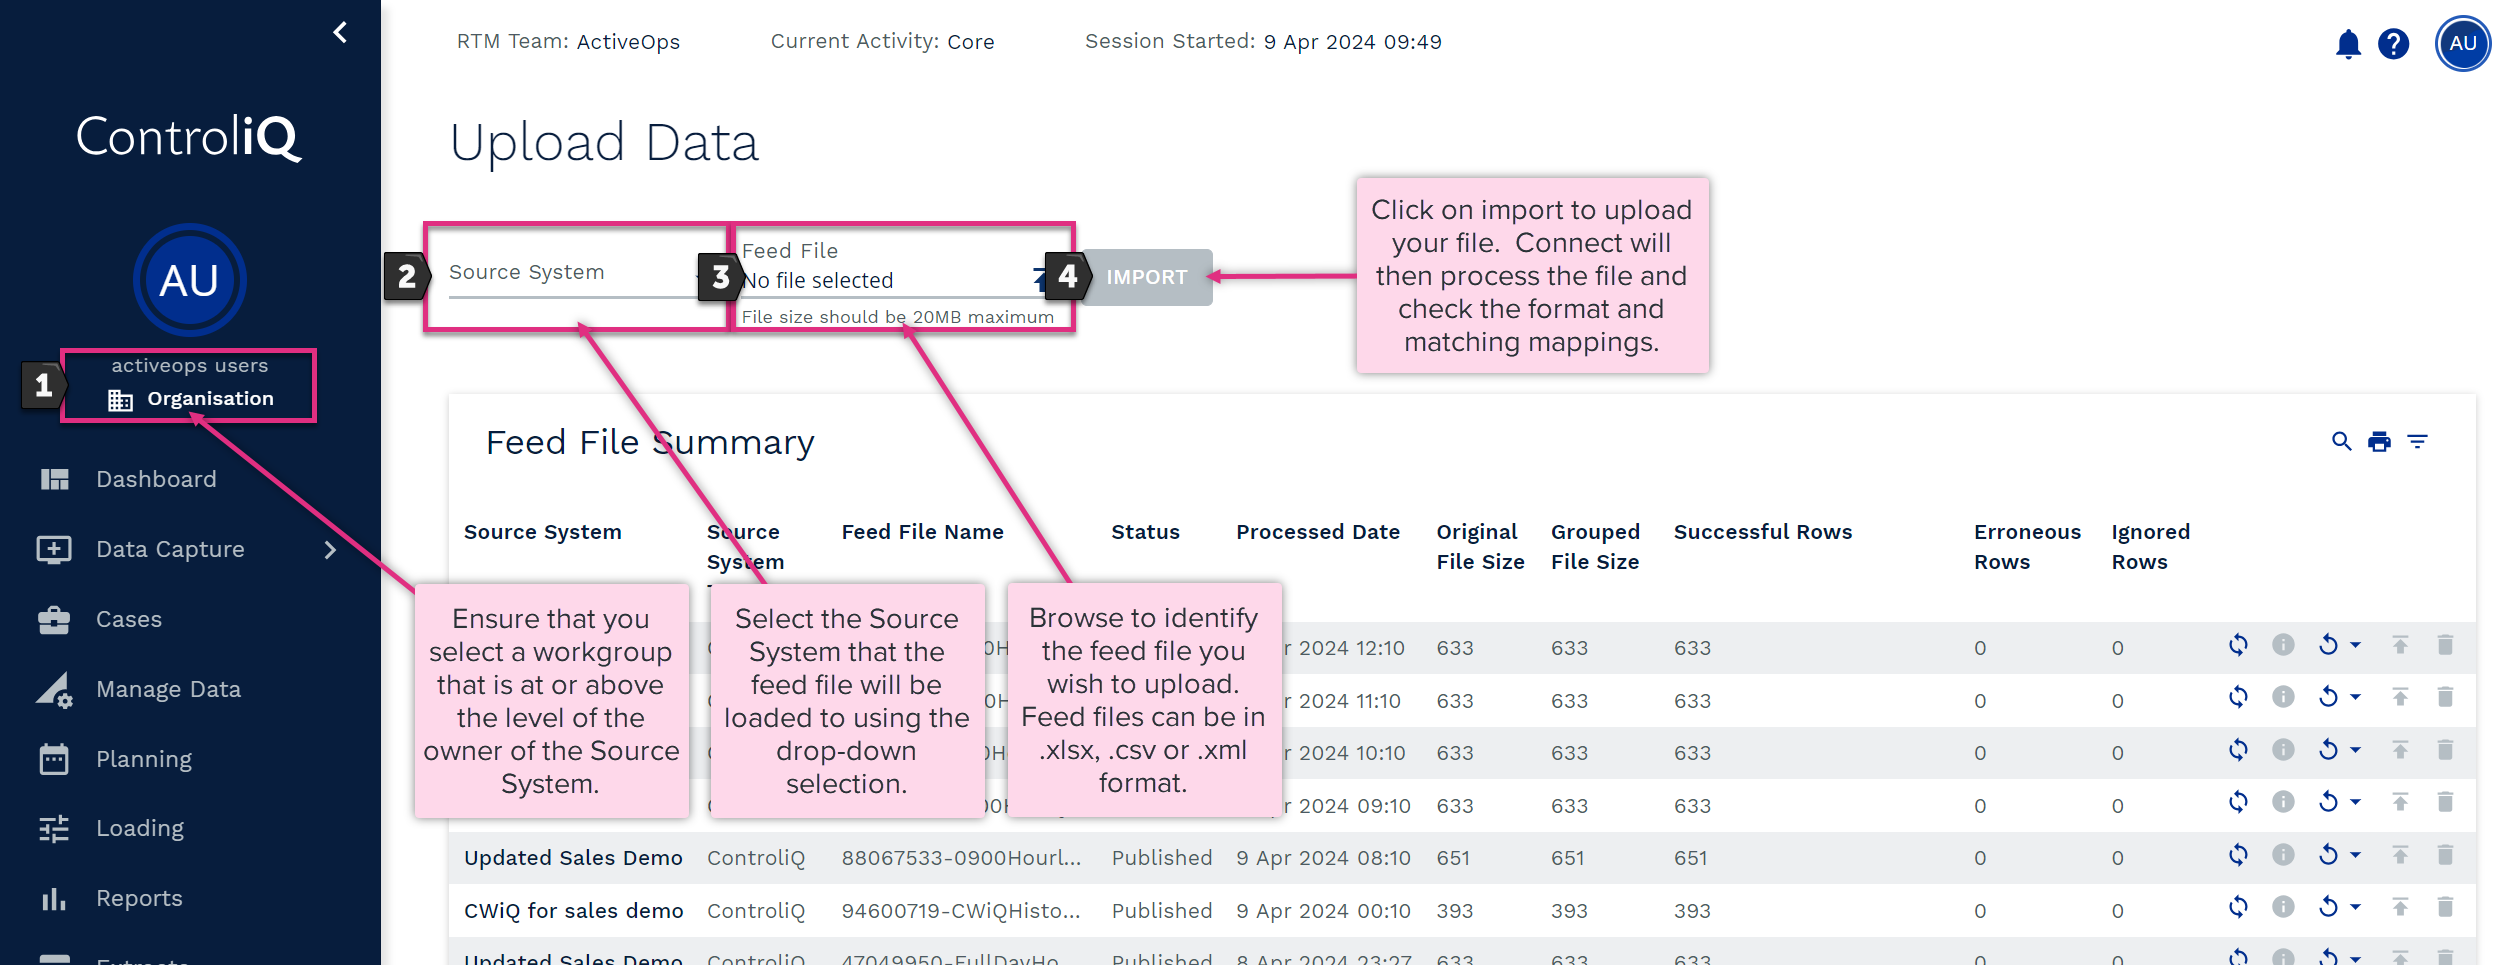
Ensure that you have selected a workgroup that is at or above the level in the hierarchy of the owner of the Source System you are loading a file to. Once you have selected the correct workgroup you will be able to see the available Source System in the drop-down list. After you have selected the correct Source System, browse for the feed file to import, and click Import.
When the file has been imported, Connect will verify the feed file format and check the feed file to confirm all the expected data columns are included in the file. If there are any issues with the file format or there are missing columns of data in the feed-file, then the status will indicate Processing Error.
When the file is in process of being uploaded, it will firstly display File Received and then assuming there are no issues with the file format or missing columns, Awaiting Processing and then Processing in the Feed File Summary table under Status.
You will need to refresh using the  icon after upload to see the status changes as the feed file is processed.
Once the file is processed, the status will change to either Unpublished or Published depending on whether you have chosen to auto publish feed files. You will then see a summary of the number of rows of data that were successfully loaded, any erroneous rows of data and any rows that have been purposely ignored.
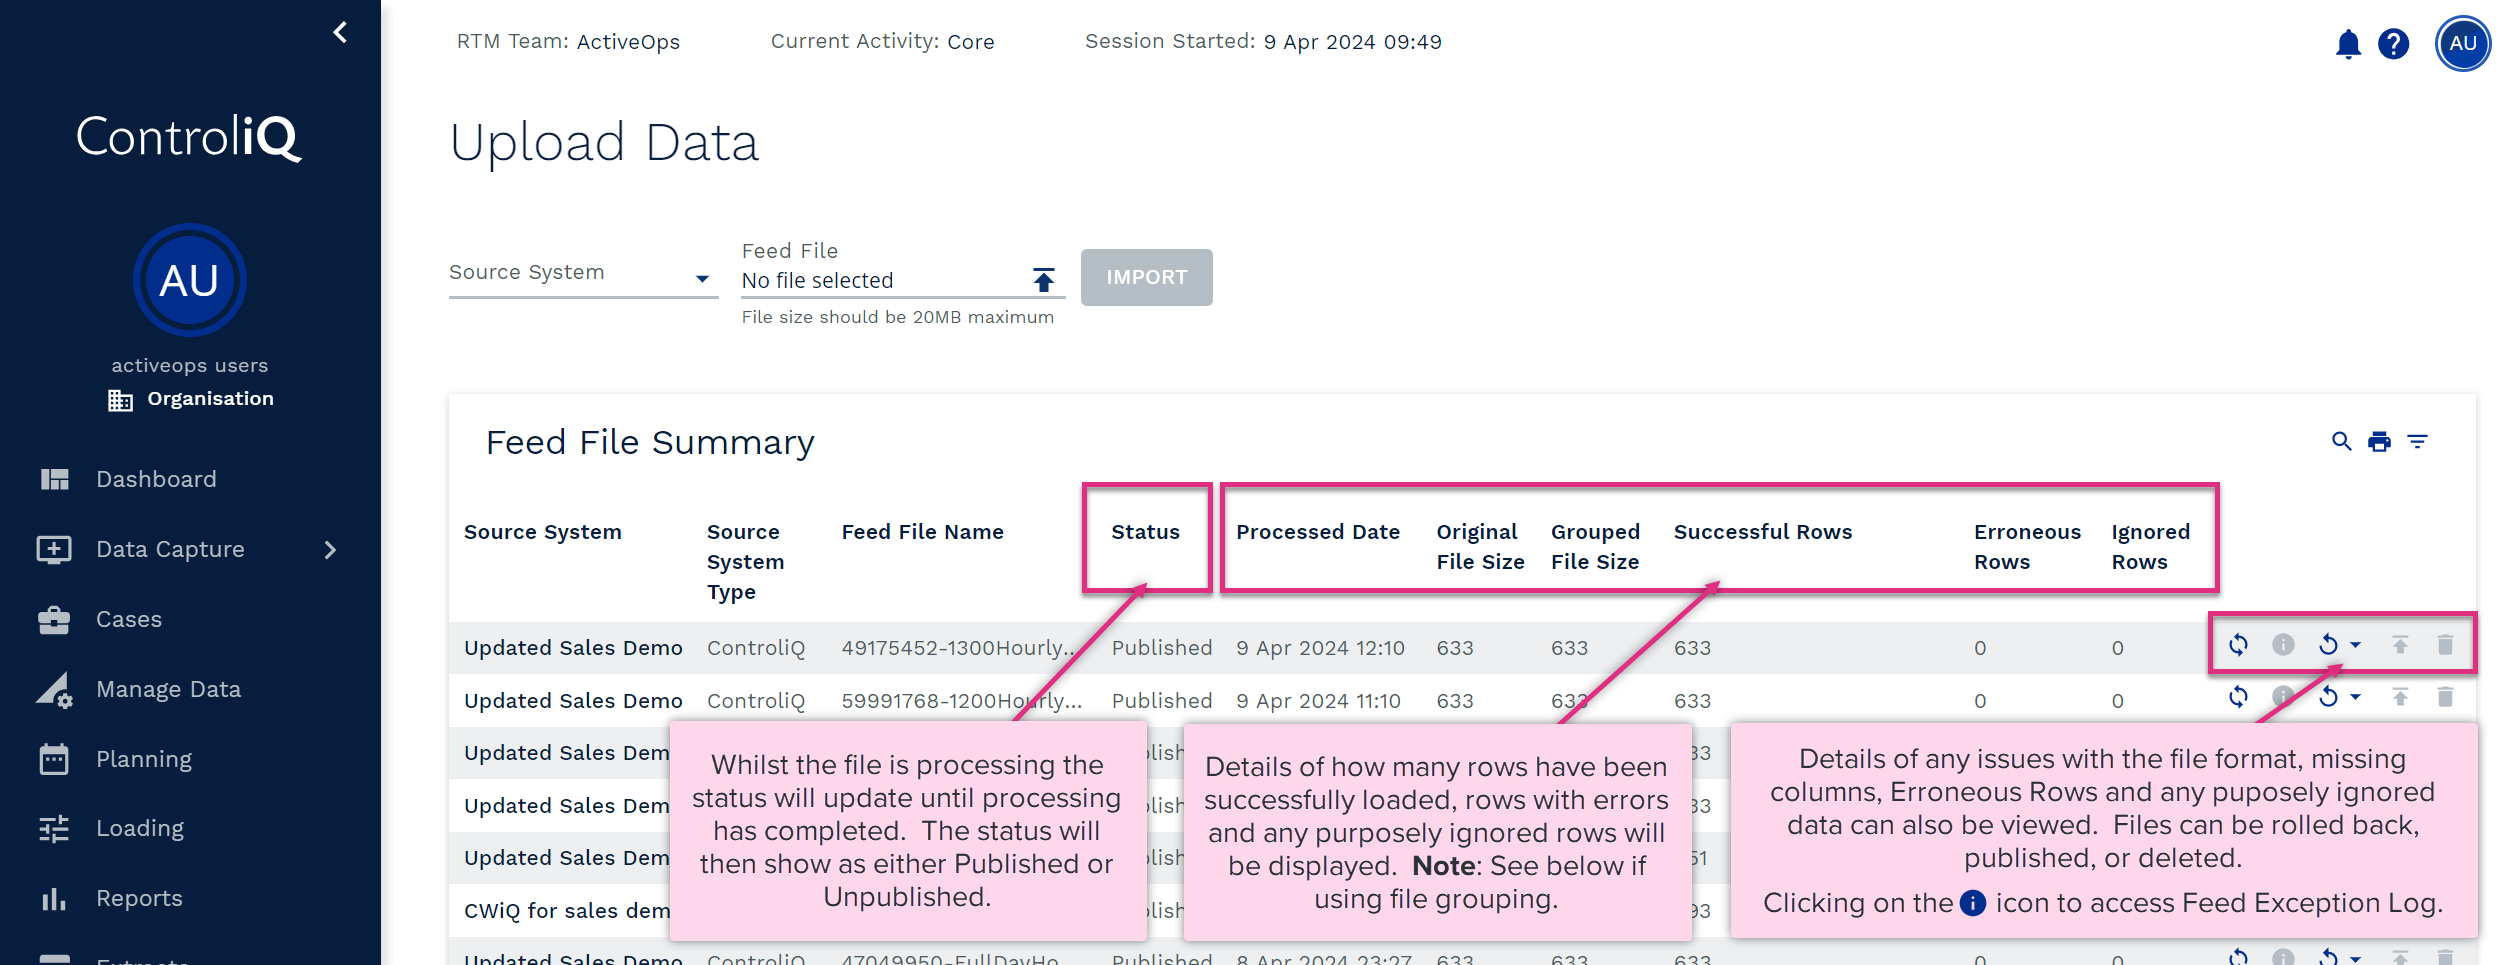
Clicking on the  icon will open the Feed Exception Log table to provide details of any processing errors or enable you to view the details of any rows of data that have not loaded either due to errors or being ignored.
If an incorrect mapping causes any errors, click the rollback ( ) icon. Return to the Mappings tab and select the pen icon to edit the mappings. Once errors are corrected, return to the Upload Data screen, and import the feed file again. When you are sure the data is in an acceptable form for ControliQ, click publish (
 ) icon, assuming the source system is not set to Auto publish. Rolling back of data can also be performed for files that have been published if auto publishing has been enabled for the source system.
Automatic data upload is achieved by setting up the source system to ‘drop’ the feed file into a folder using SFTP. Details of how to set up SFTP can be provided by the ActiveOps Support Team.
| Note: If enable grouping is used for any Source System, there will be two additional columns showing the number of rows from the original file, and the number of rows after grouping. Successful rows are based on the grouped file size, not the original size |
ControliQ Connect can report errors and ignored maps for each file, which are found in uploaded feed files in a Feed Exception Log.
To open the Feed Exception Log, from the Upload Data screen, select Data Capture > Upload. In the Feed File Summary table click the information icon  to open the Feed Exception Log for the file you want to view.
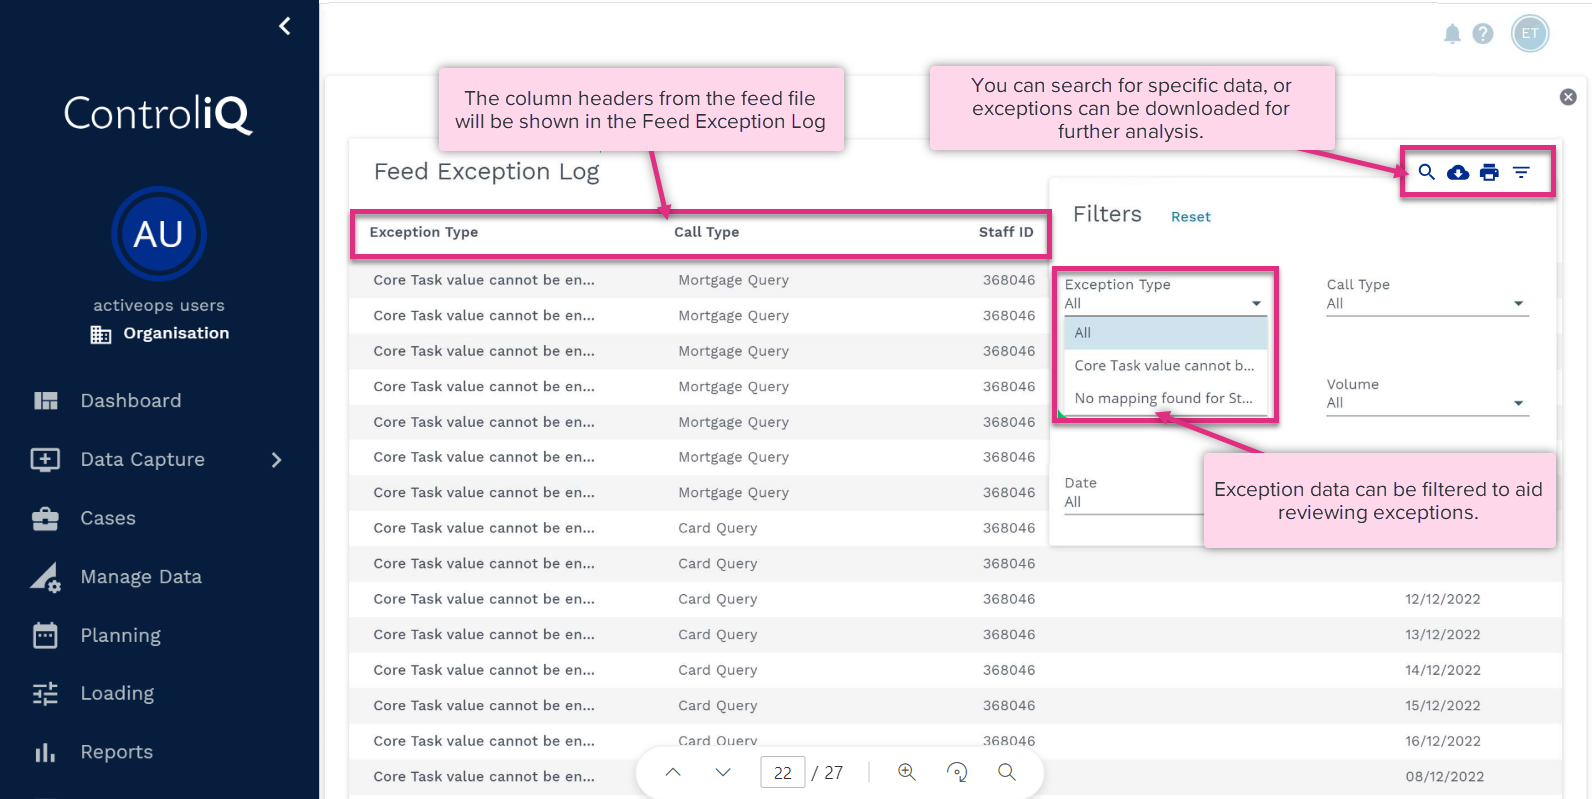
The Feed Exception Log can show different error types. Where an item, team or staff member map is set to ignore, Connect reports this as an exception rather than an error.
The Exception Type column in the Feed Exception Log provides specific information on the cause of the error. You should use this together with the data row details to identify and resolve the error. The most common feed errors in Connect are related to how the maps have been set up for that Source System. This could be maps for the item, team, or staff member created on the Mappings screen, or the feed column mapping performed in the Source Systems screen. Attention should be paid to developing maps, as their accuracy affects completeness and accuracy in ControliQ.
|
Note: If enable grouping is used for the Source System, the exceptions will also be grouped. Each exception will include a volume column to understand the impact of the error within the File. |
The table below shows examples of the different types of feed file errors that can occur within Connect and steps to resolve the error.
| Error Type | Explanation |
|---|---|
| Mapping |
No mapping found for Item, Resource, Staff Member, Team, Workgroup
Core Task, Diverted Task, Downtime, Staff Member not found
Borrowed record cannot be uploaded against Staff’s home team
|
| Hierarchy |
Core Task, Diverted Task, Downtime, Staff Member not assigned to specified Workgroup.
Work Out, Downtime cannot be recorded against a department.
Item, Staff is not a part of the Source System hierarchy on the specified date.
|
| Data Integrity |
Item / Staff / Team has more than one mapping.
Staff Member no longer captures data or no longer exists.
Work In or WIP or WorkOut cannot be entered for future date.
|
| File Format |
Date format invalid
Work Out, Time should be less than 999999 seconds.
Units column contains non-numeric values.
Workout cannot be a decimal number.
|
| Ignore |
Item, Staff Member, Workgroup mapping set to ignore.
Where an item, team or staff member map is set to ‘ignore’, Connect will report this as an exception. This serves as a warning to you that the unit value for the affected row will not be available in the Worklog. You can either choose to accept this warning or correct it in the Mappings tab. The Ignore column should state No in the map's data row if you want the data to show in the manage data screen. |
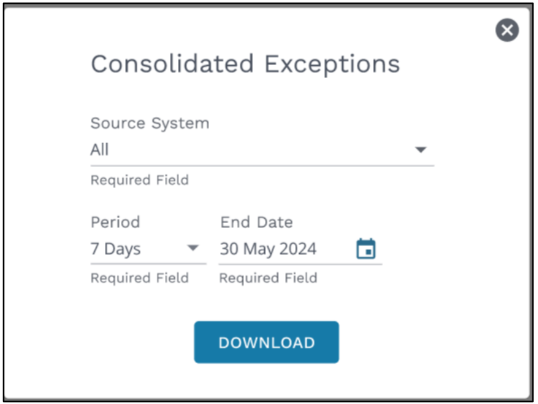
You also have the option to download the consolidated exceptions from multiple files per source system, or multiple source systems, for a specified date range using the Consolidated Exceptions feature. This option can be particularly helpful if you are loading multiple files to the same source system per day as it will help you to identify all exceptions encountered.
Once you click on Consolidated Exceptions you will be asked to specify the source system and date range for the exceptions. Once you have set your parameters click download.
Ignored Maps are exceptions
Where an item, team or staff member map is set to ‘ignore’, Connect will report this as an exception. This serves as a warning to you that the unit value for the affected row will not be available in the Worklog.
You can either choose to accept this warning or correct it in the Mappings tab. The Ignore column should state No in the map's data row if you want the data to show in the manage data screen.
Feed Emails
Where an email address or distribution list has been provided for the source system, Connect will send emails informing the people(s) of the uploaded feed file’s status. This is very useful in cases where the source system is set to upload feed files automatically. When errors are reported in the feed email, this should prompt investigation into the Feed Exception Log for the upload in ControliQ.
Publishing data to the Manage Data screen.
It is possible for the user to make uploaded feed file data automatically available in the Verify Data screen by setting the source system to Auto-publish. However, when first creating maps and where errors are anticipated in the feed file, we advise you not to set up the source system with Auto-publish selected. This allows you to review the uploaded feed file for errors and make the necessary corrections before clicking Publish on the Upload page. Publishing the feed data makes it accessible in the Manage Data screen. In the Manage Data screen, you can check your data for errors before saving it.
Error Handling
Connect can report feed file mapping errors on-screen and via email, feed file error reports sent via email are provided per the source system set-up. On-screen errors are always available from the Feed Exception Log.

Deriving Team Data
Connect can use logic to derive Team IDs where these have not been provided in the feed file. For Connect to derive team IDs, one of the following conditions must be met by the data provided in the file:
The Task is assigned to the Staff Member’s home Team.
If the task is assigned to the staff member’s home team, and no team is identified in the in incoming data, connect will attribute the Work Out to the staff member’s home team.
The Task is assigned to a unique Team.
This means the task is only assigned to only one team in the staff member is not assigned to the team that the tasks is assigned to, and no team is identified in the in incoming data, connect will attribute the Work Out to the unique team that the task is assigned to.
Connect will then create a loan / borrow record in the Manage Data screen without indicating the actual length of time for which the staff member was loaned/borrowed. This could create an error in the Manage Data screen, if the time spent in the lent team is not accounted correctly. This time may have been captured through RTM or a separate source system for lend / borrowed time; if not, the team leader must enter the actual length of time (in minutes) for which the staff member was loaned into the Manage Data screen.
Having a default team
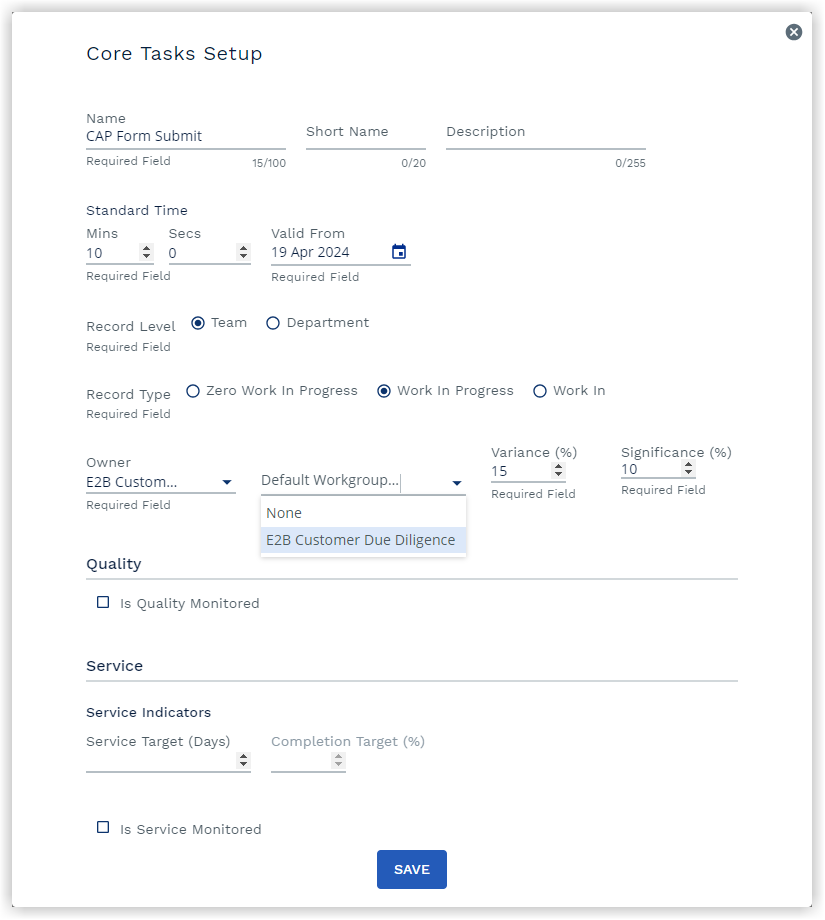
Tasks can be shared by multiple teams or and therefore not specific to a particular team. When staff members are loaned to a department where tasks are shared across multiple teams, and no team data is included in the feed file, unless a default team is specified connect will return an error when loading the data.
In the Admin > Core Tasks screen, you can set a default team for any task assigned to more than one team. By establishing a default team, connect will first look to see if the core task is assigned to the staff member’s home team, but if not, will then report the work against the default team, creating a lend record for the staff member.
From the list of core tasks, select the edit icon next to the core task for which a default must be set. The Default Team for Upload field will populate a drop-down with a list of teams to which the core task is assigned. Select the default team and save. Connect will now assign any workout completed by a staff member from a borrowed team to this team, eliminating future errors for this task in the Feed Exception Log.
